Data Scientist Utilizing Software Engineering for Powerful Data Analysis and Machine Learning!
Word Count: 192
Hello there, my name is Ethan! As of writing this, I am 20 years old and started my journey at Full Sail University in 2021.
My original degree path was the Game Development Computer Science program, but wanting to explore more opportunities in computer science led me to the Artificial Intelligence concentration.
I have always been involved with technology from a very young age. I first heard about Full Sail University in a game magazine when I was 10 years old. I ripped out the flyer and kept it as a reminder of what I wanted to do!
After going through the entire game development course and now the artificial intelligence course, I'm finally ready to finish off my bachelor's studies.
The purpose of these blogs is to document my progress during my four-month-long capstone project that I will be working on with a team.
My goal is to have an end product that I am proud of and that has some innovation built in. I don't want to have a generic project as my last one, but something exciting and new that will highlight my work here at Full Sail University.
Word Count: 389
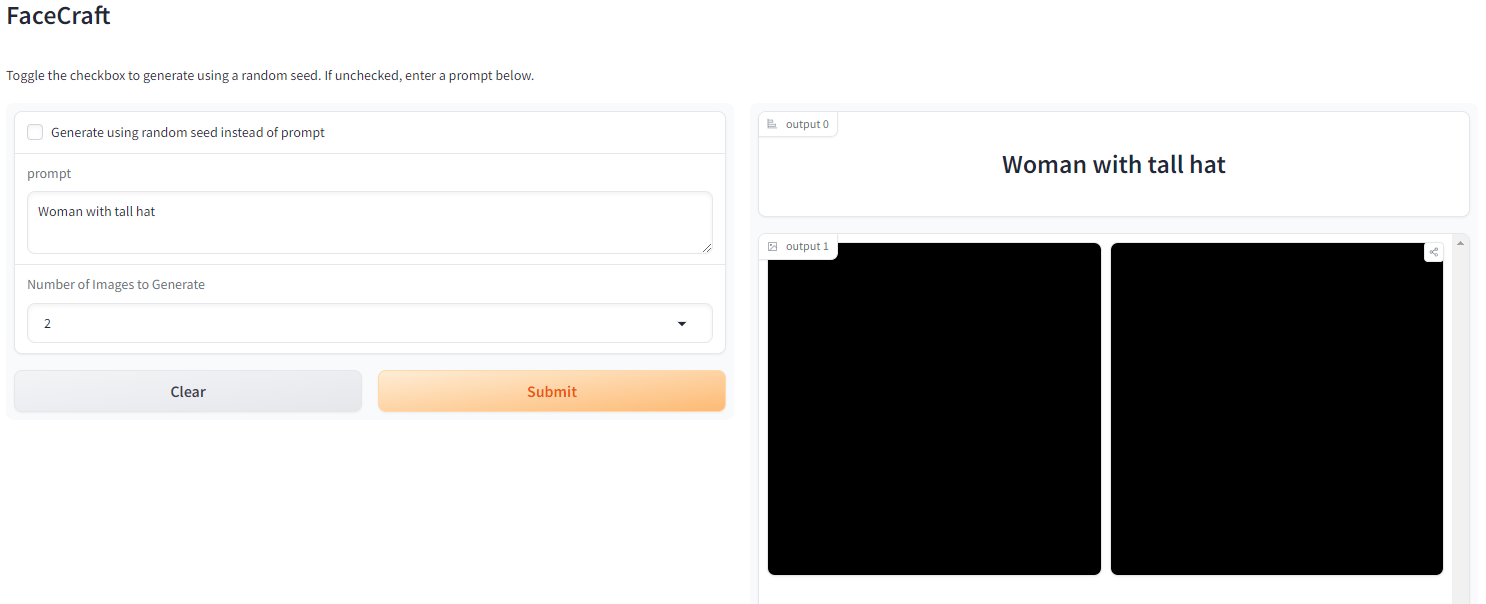
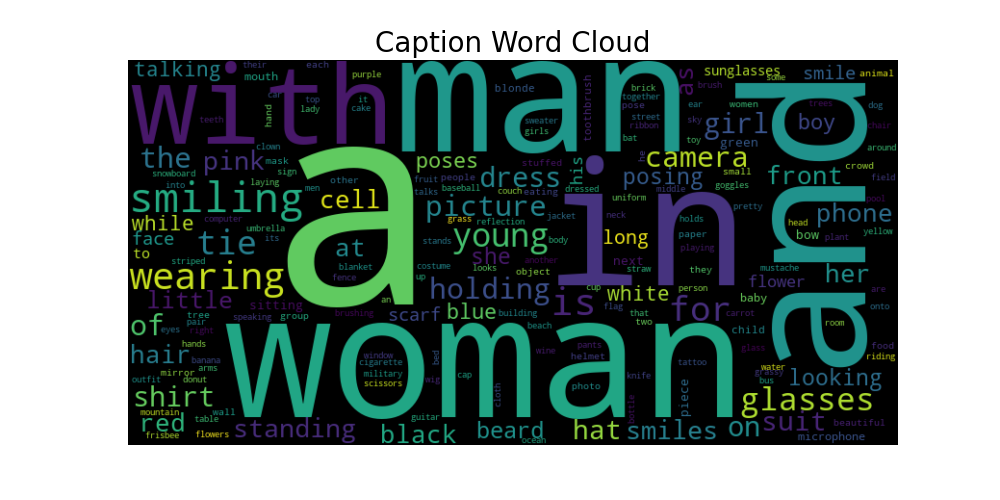
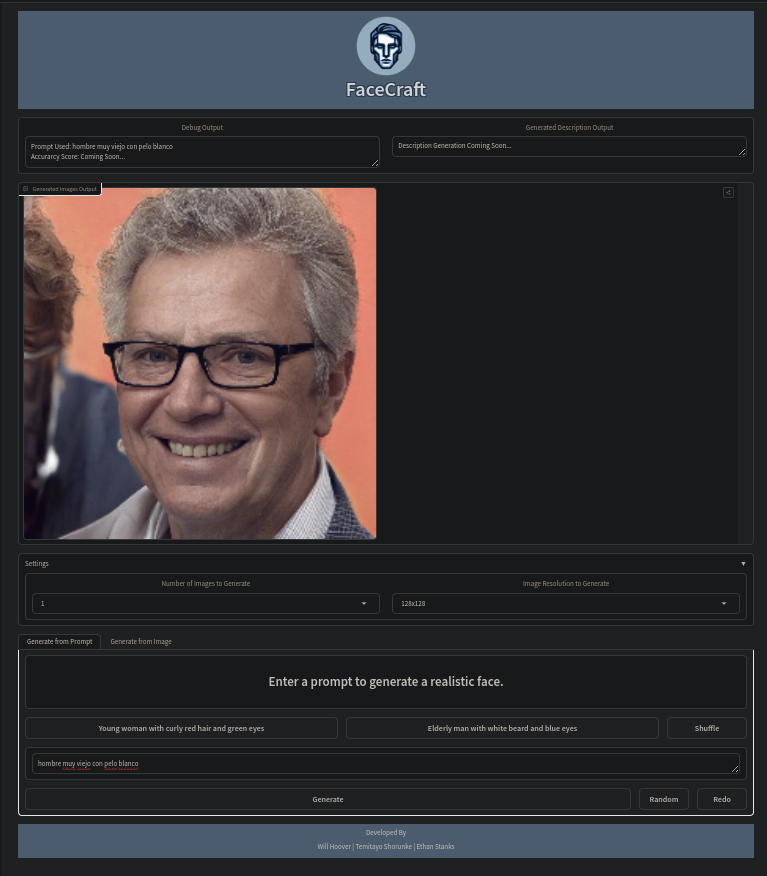
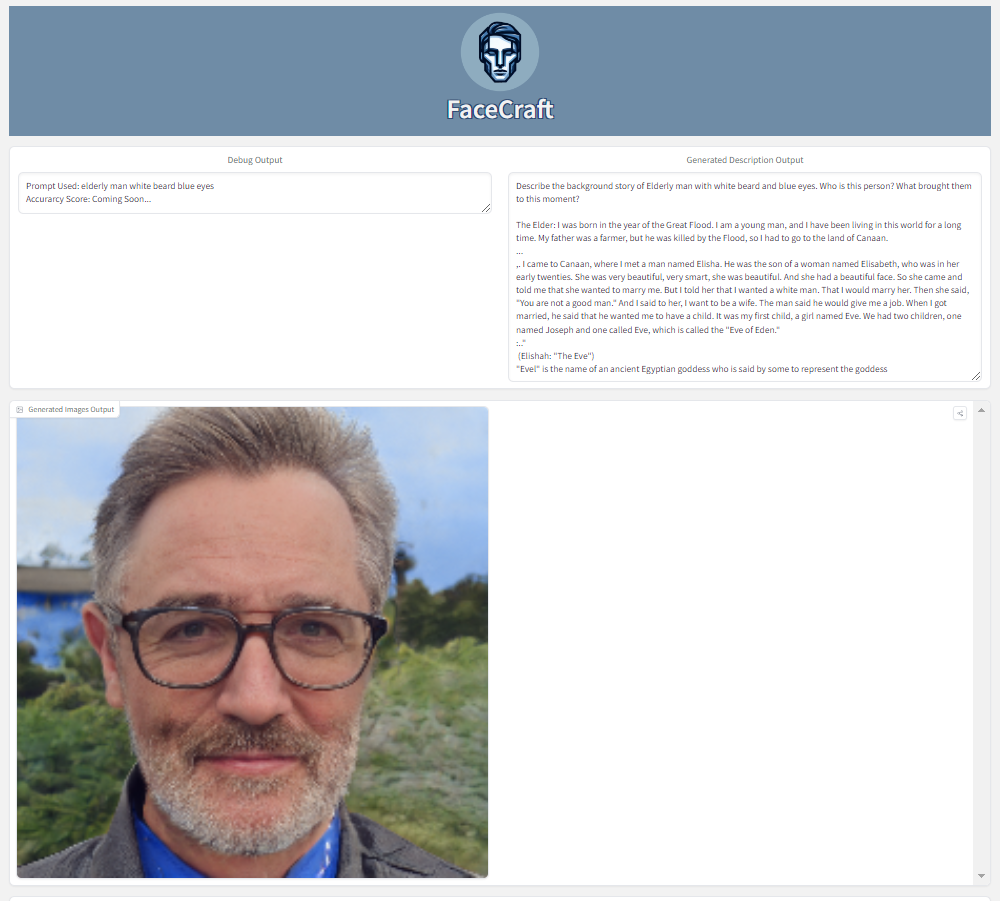
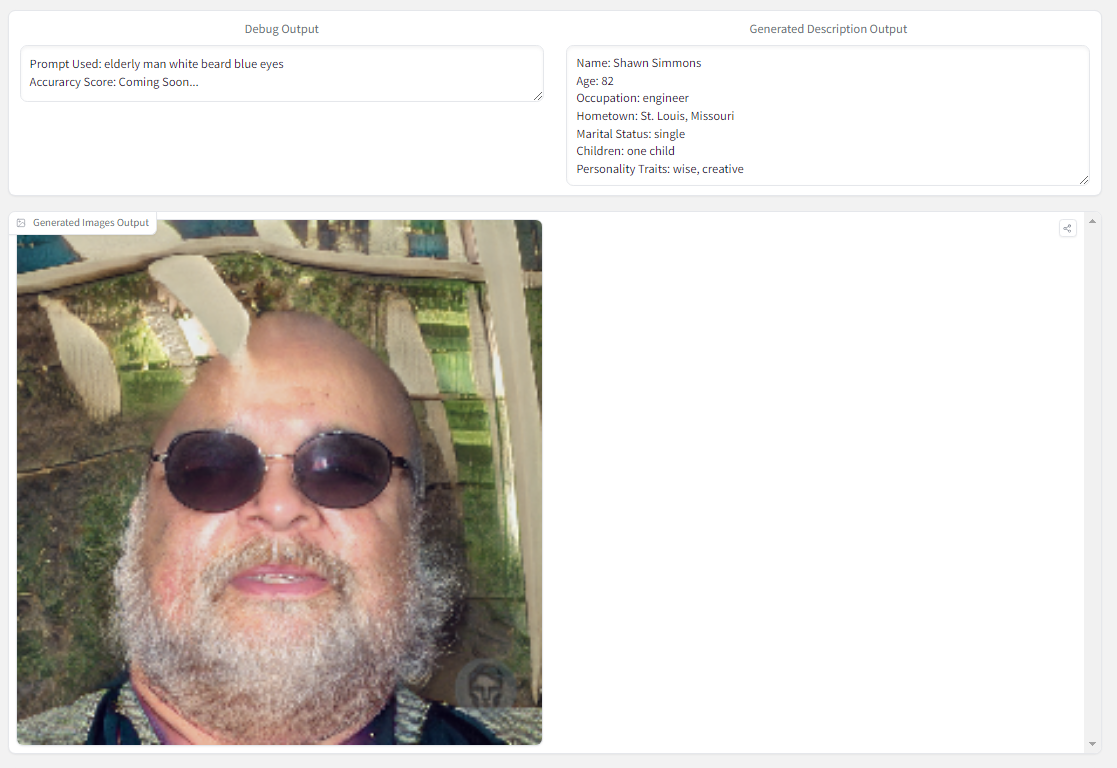
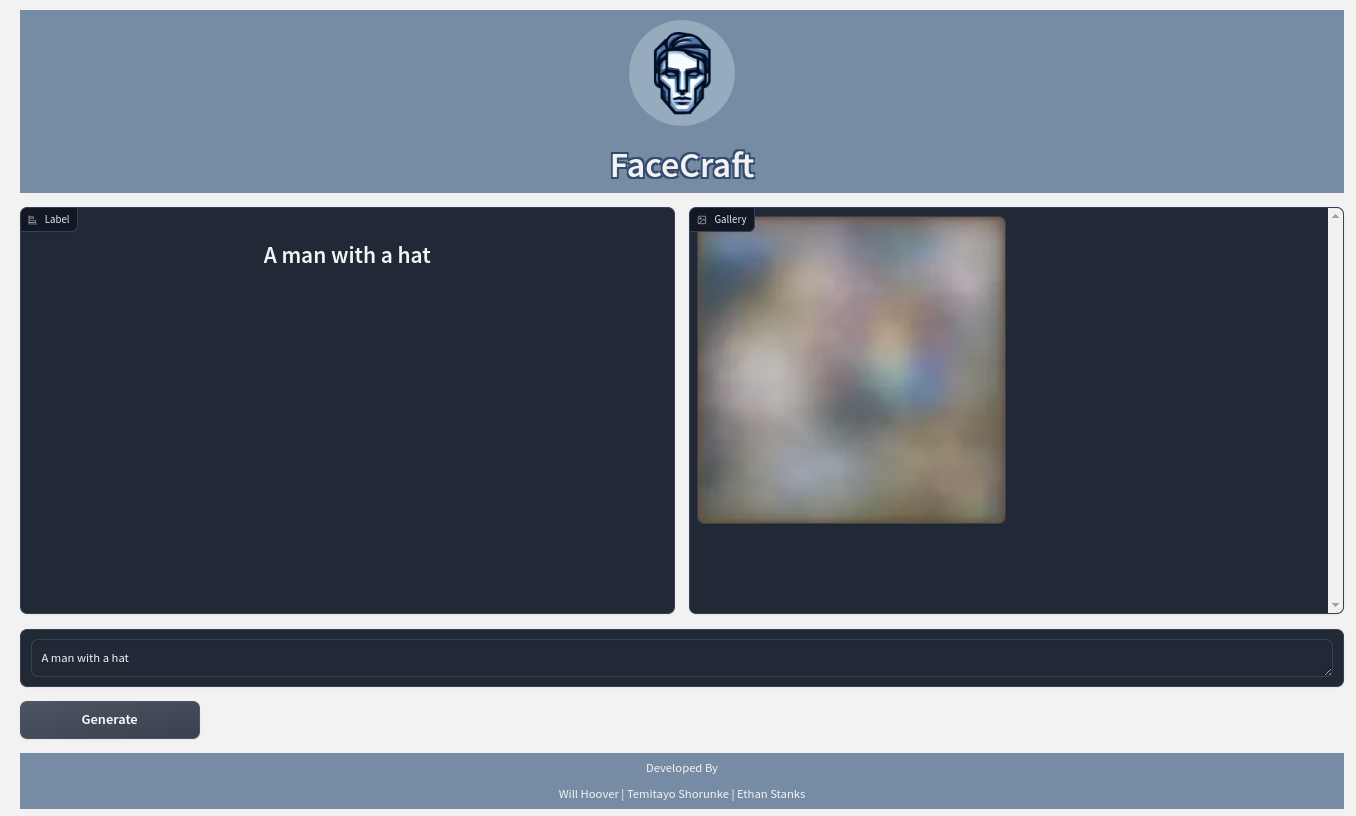
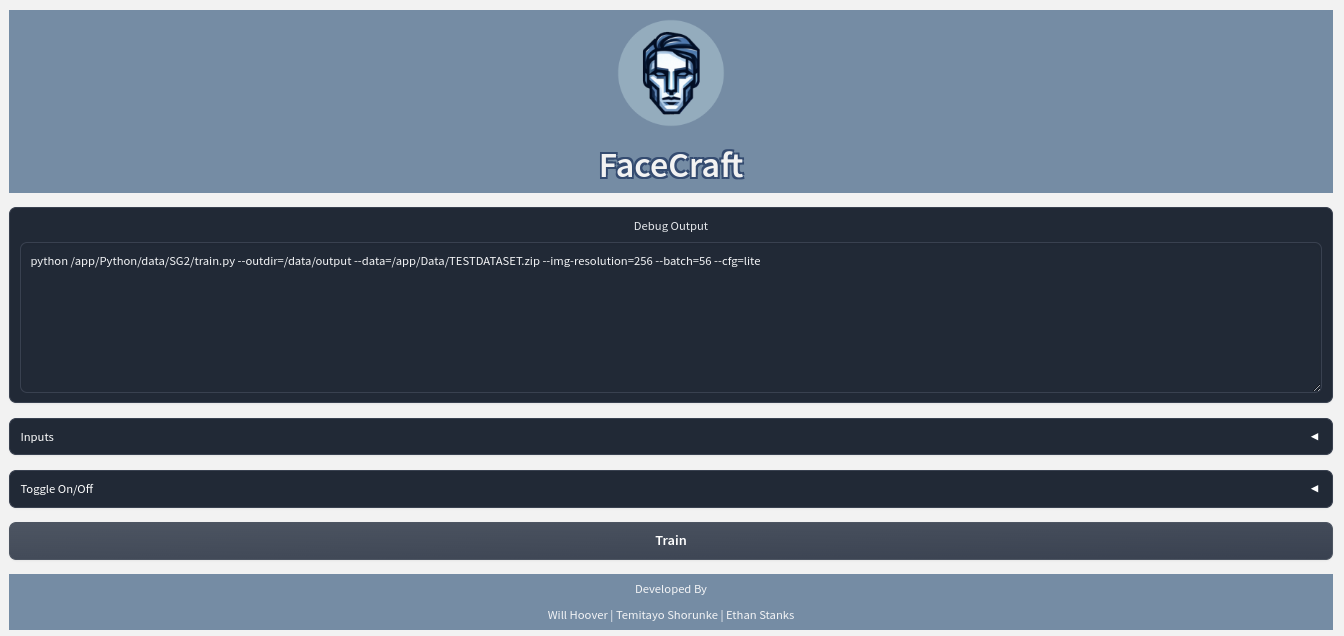
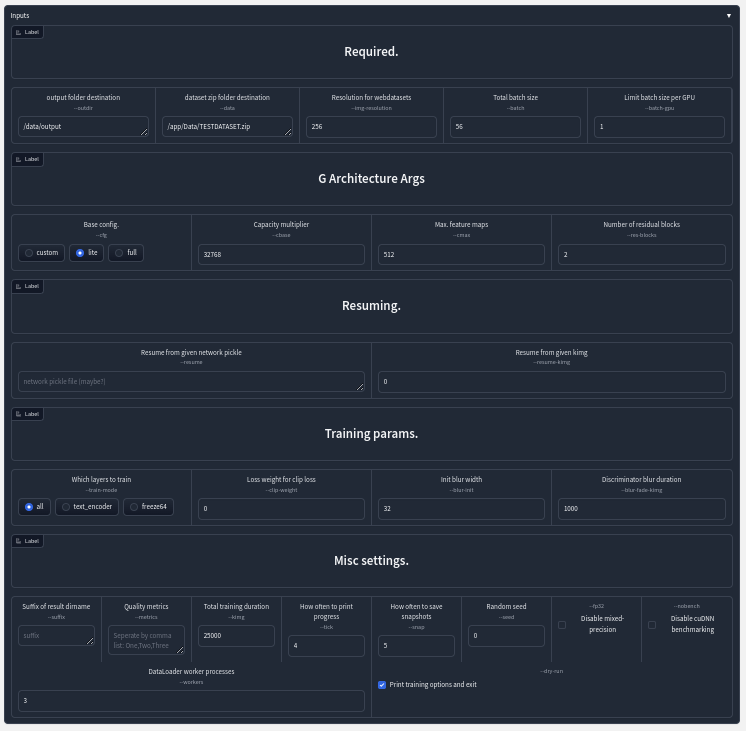
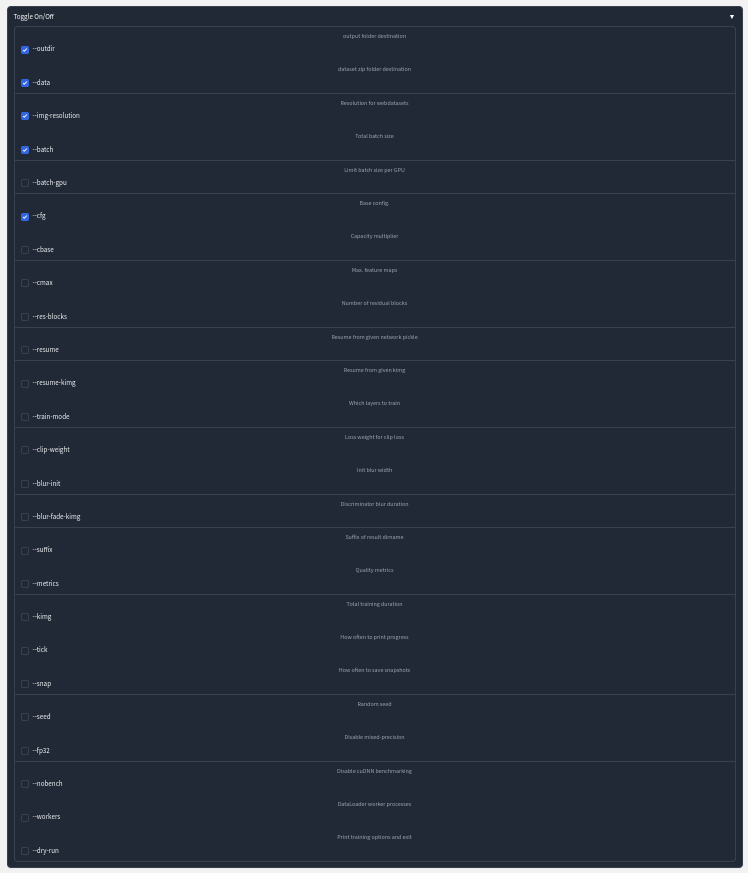
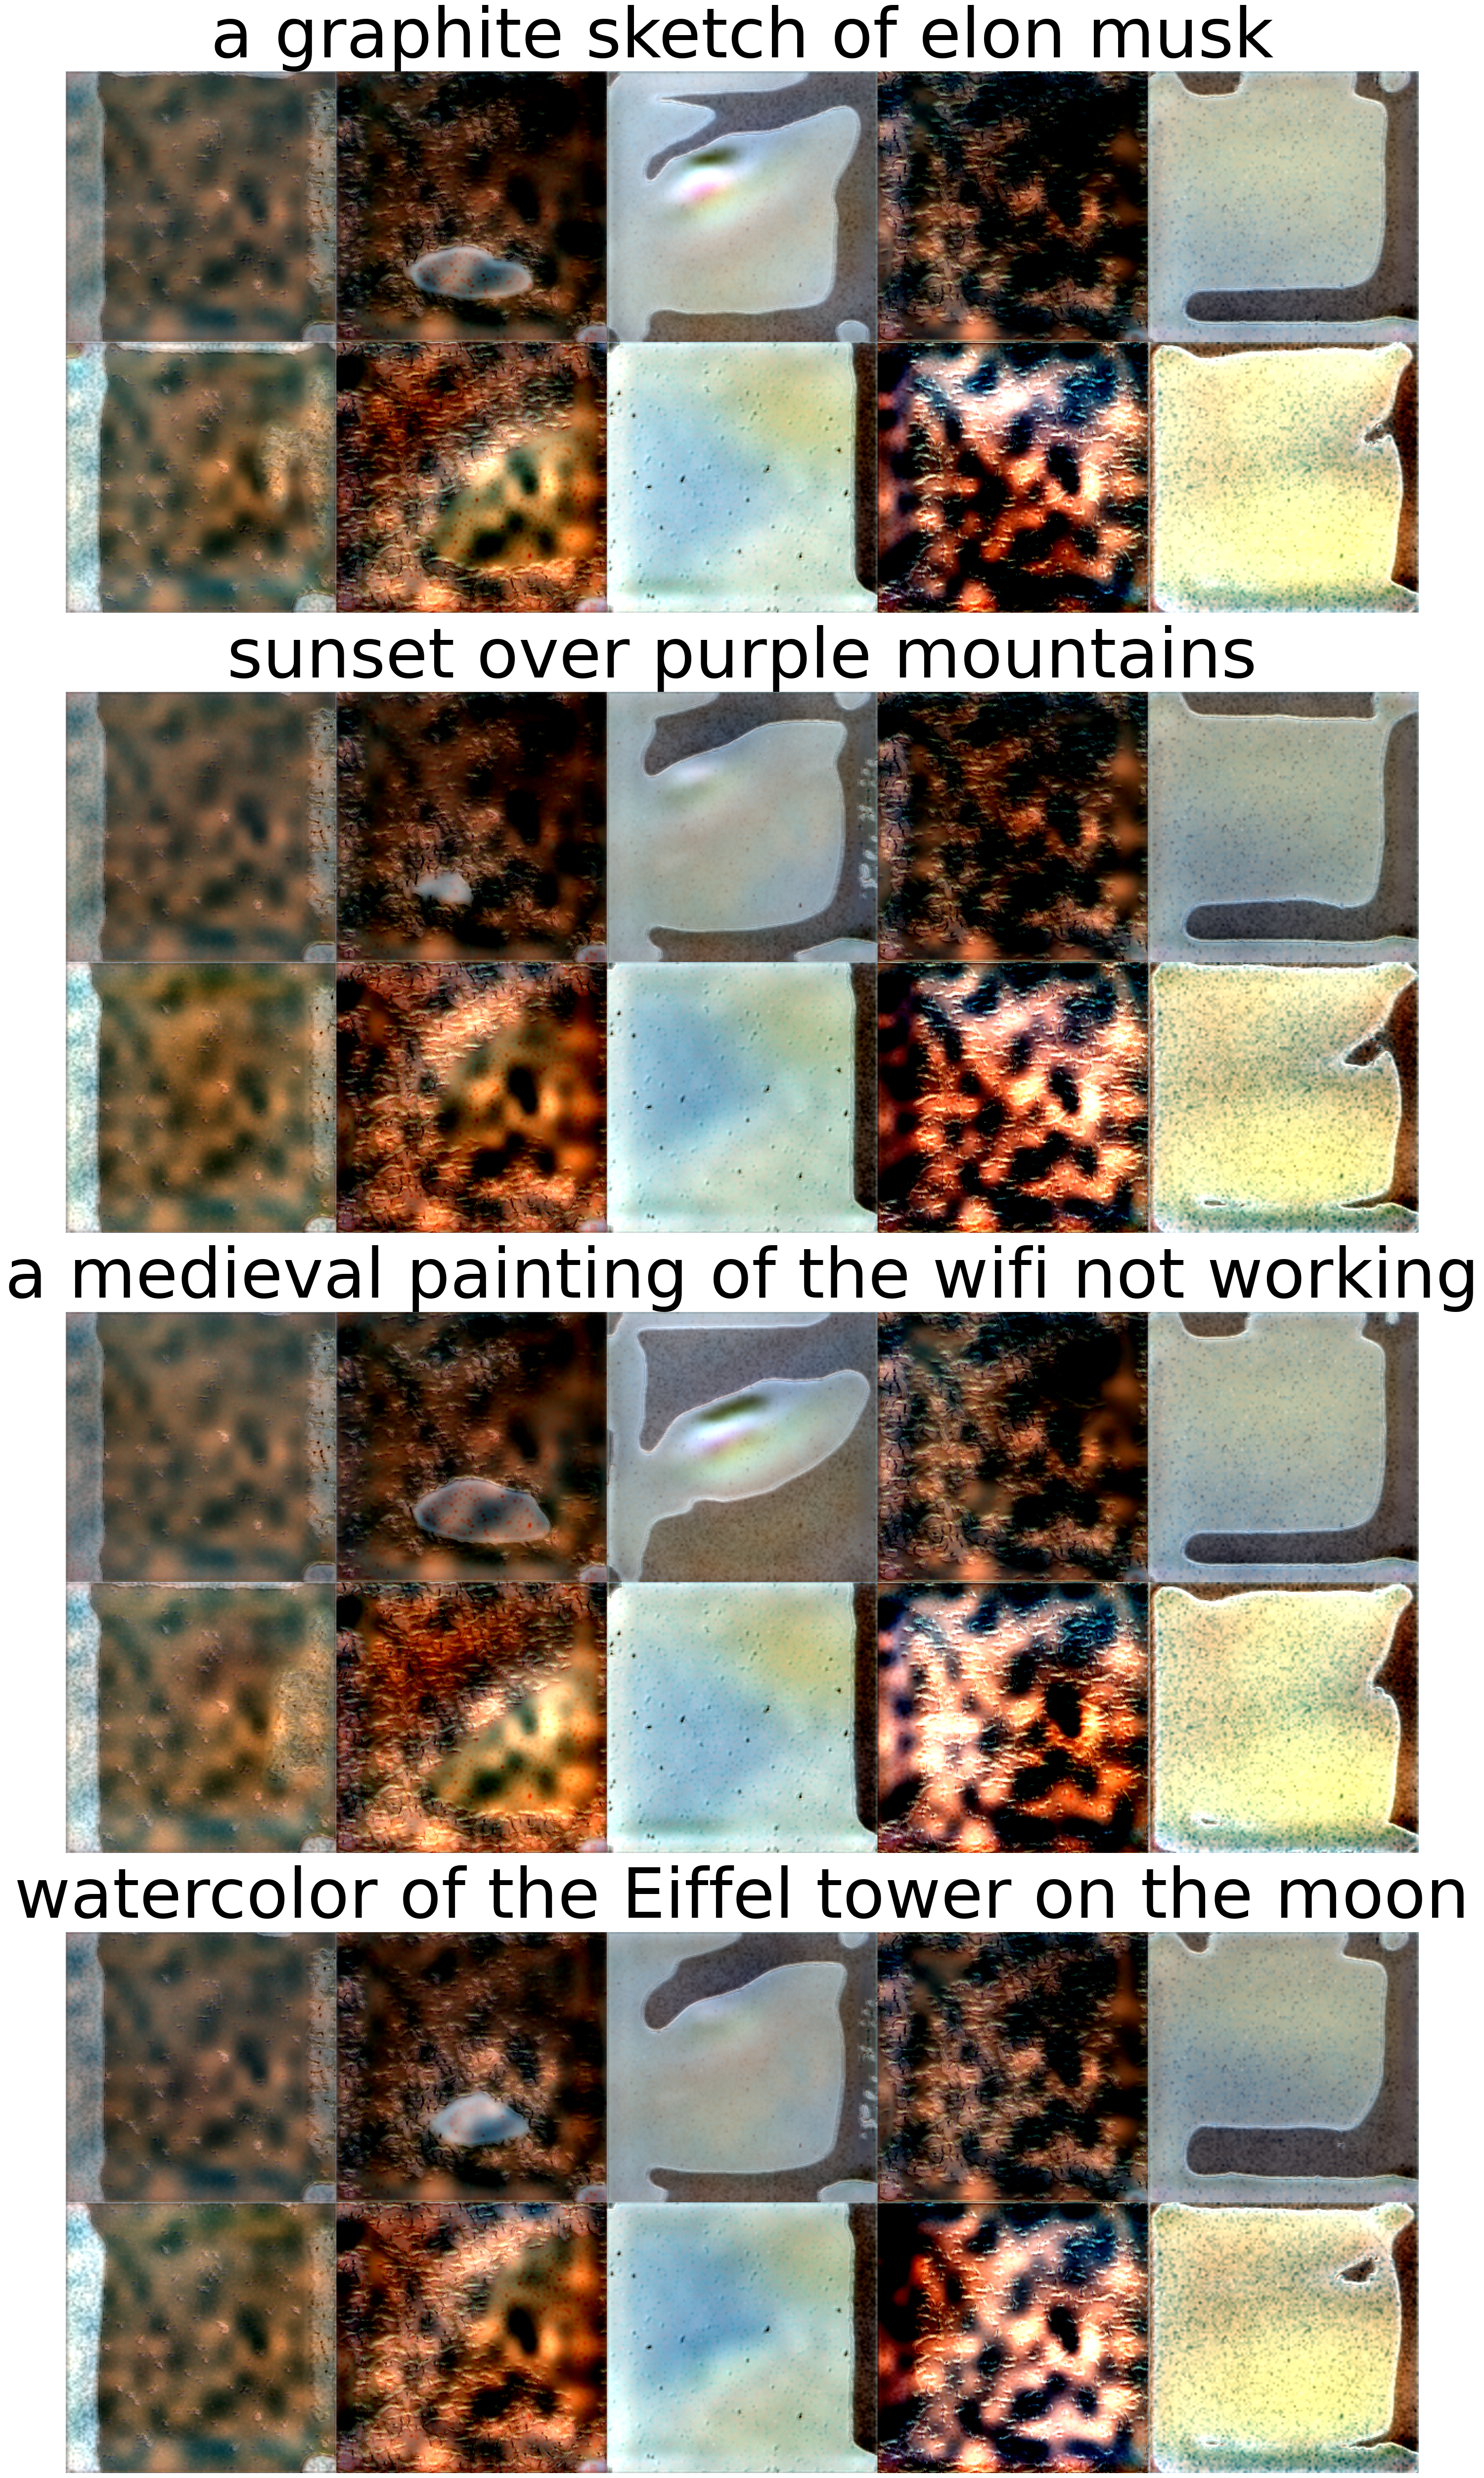
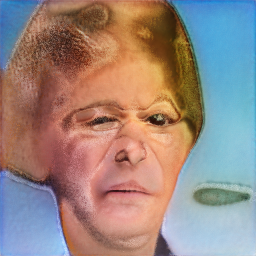
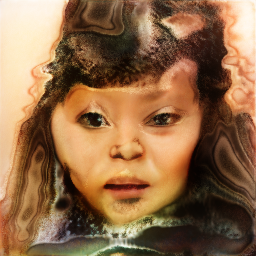
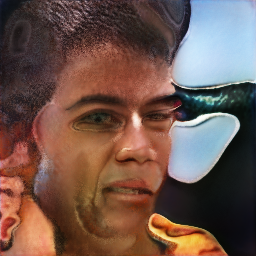
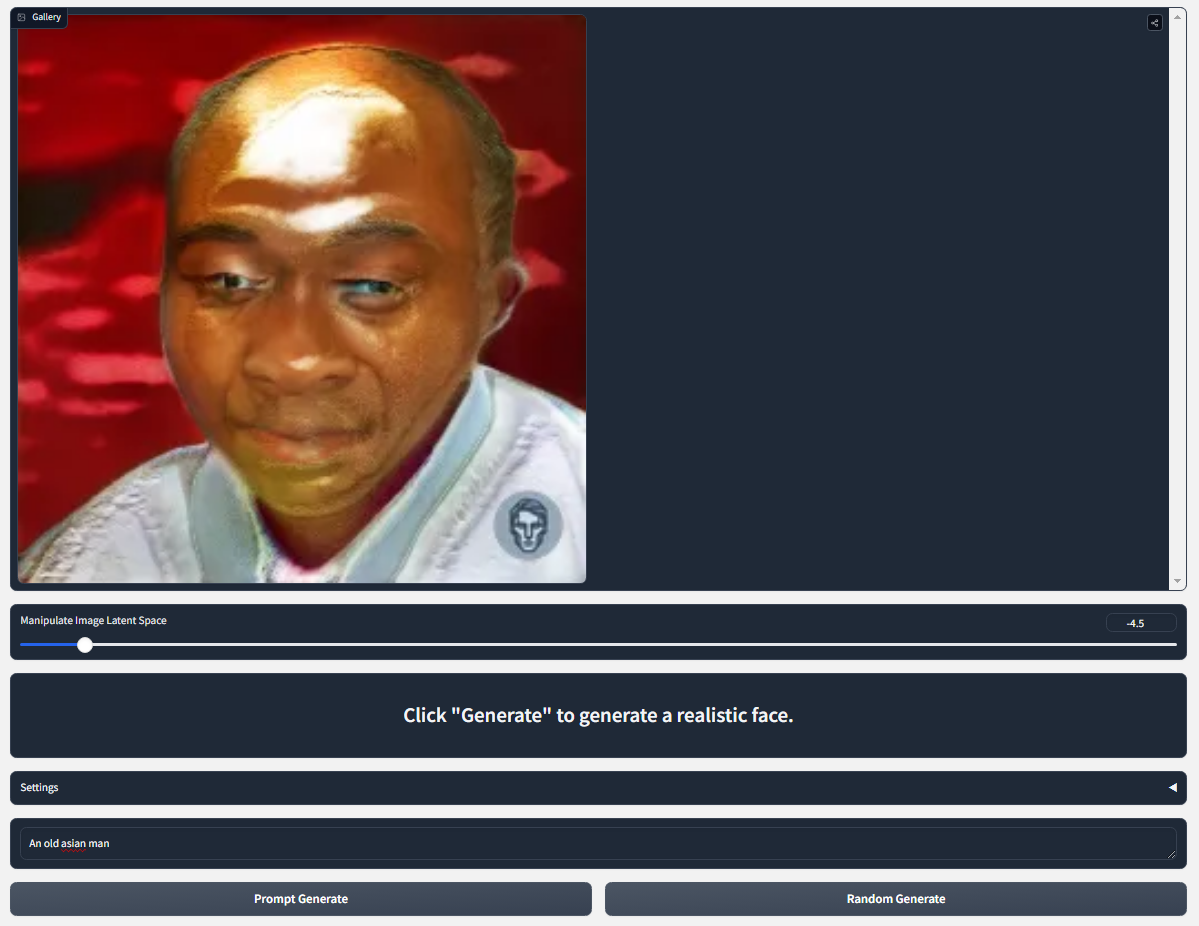
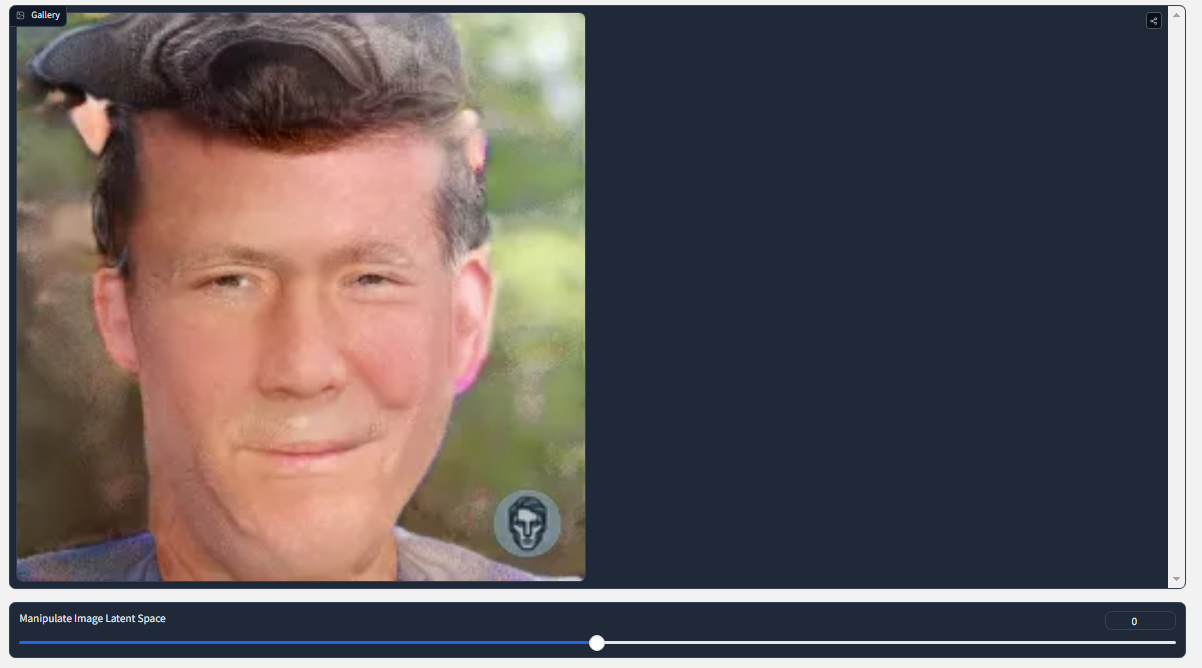
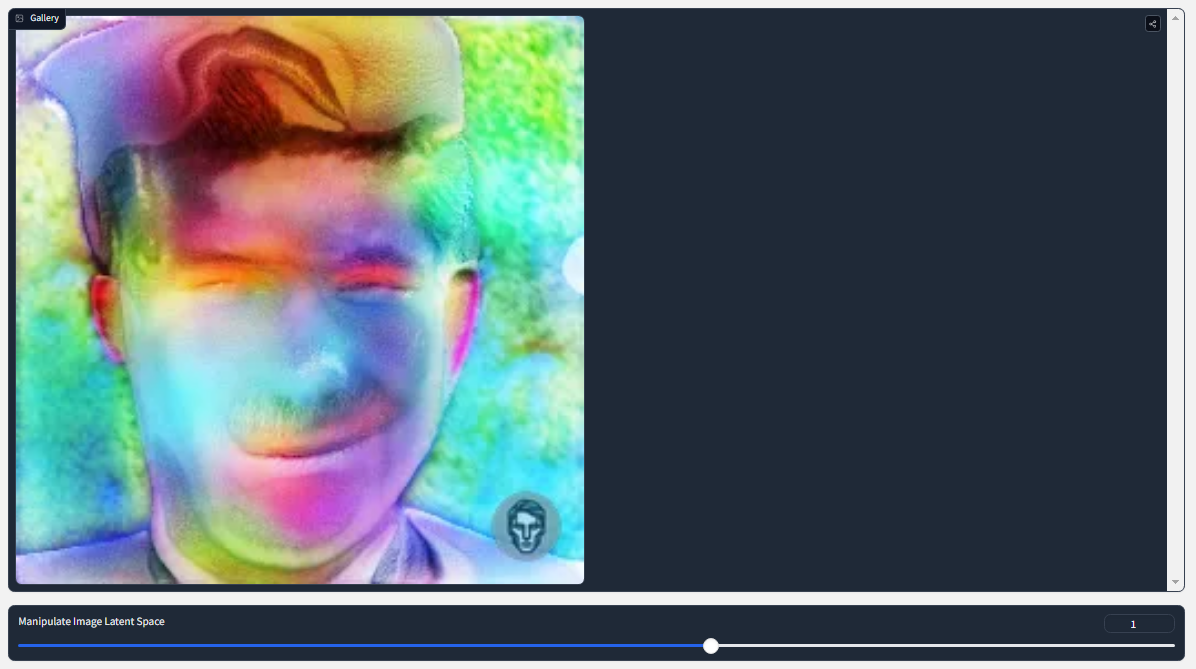
My team and I are currently wrapping up week two of our first month. Last week, we decided on a project idea out of the three of our pitches. Will's Pitch is an artificial intelligence anti-virus for detecting malicious threats in the firewall. Temitayo's pitch is a machine learning GANs model that generates realistic faces from prompts using NLP. My pitch is an Android app that uses machine learning to recommend recipes based on user feedback and the ingredients in their kitchen. We all agreed that Temitayo's realistic face GANs model would be a perfect project to finish off our degree and showcase our abilities.
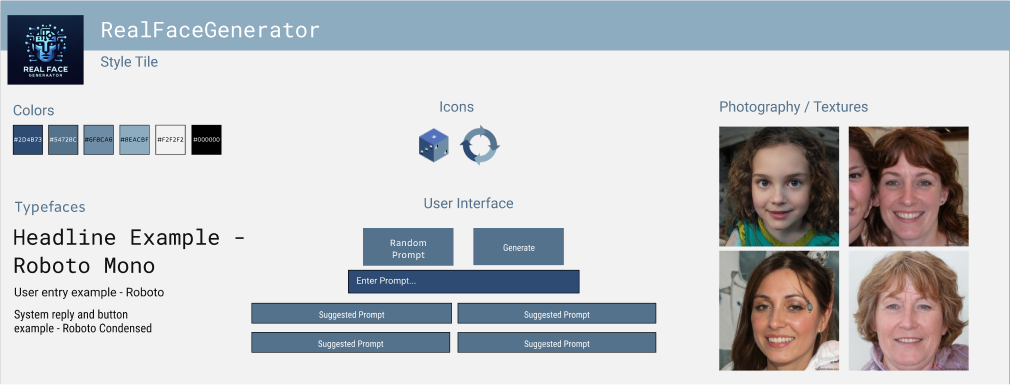
This week, the team and I got together to create the first draft for our project's design document and style tile. The style tile allows us to get the look and feel of our application without committing to it. The style tile includes the colors, typefaces, icons, user interface, and photography of how we plan on designing our wireframe for next week.
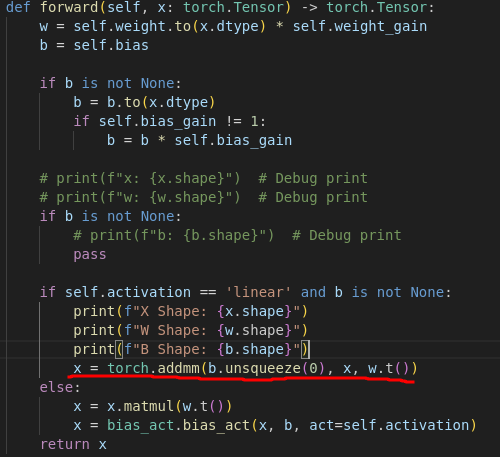
The design document went over our project's purpose, goals, requirements, development environments, use cases, and production plans. As of now, the model is set to be developed in PyTorch. Only Temitayo has experience in PyTorch, but Will and I wanted to be exposed to it as we only have experience in TensorFlow. The back-end will be developed with Django. The front-end will be developed with React. I have no experience with any of these tools, but a handyman shouldn't only know how to use a hammer but all the tools in his toolbox. With that being said, I told the team I'd like to take on the role of front-end with React.
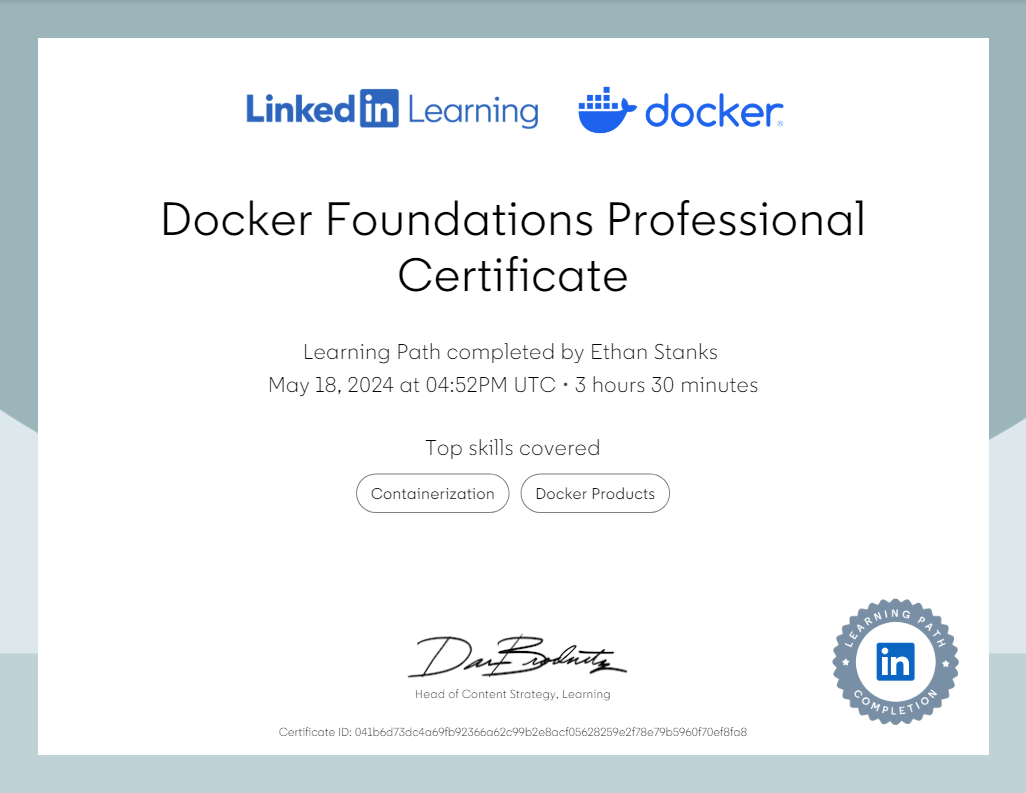
The following days, after creating the first draft for the design document, I explored LinkedIn Learning to get a feel for React. I have completed two courses as of right now to get me ready for the first month of development next month. The first course covered the basics, like creating new components, setting up development tools in Chrome, using built-in hooks, and setting up test cases. The second course has me creating a React app from the ground up, using built-in hooks, and setting up more test cases. For the next two weeks of month one, I plan on continuing my research with React to further my front-end abilities.
Word Count: 406
My team and I have one more week of planning until development starts. This week the team got together to complete the final draft of our design document, create the first draft for our front-end wireframe, and lastly, create our Jira board for project management.
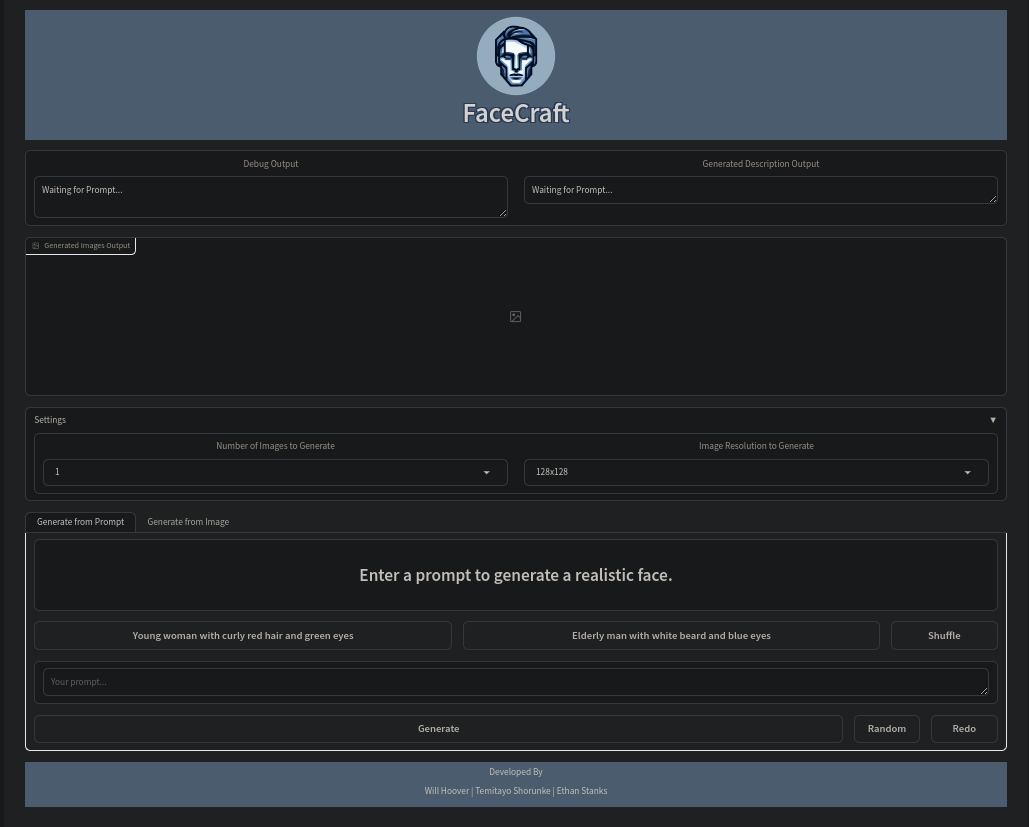
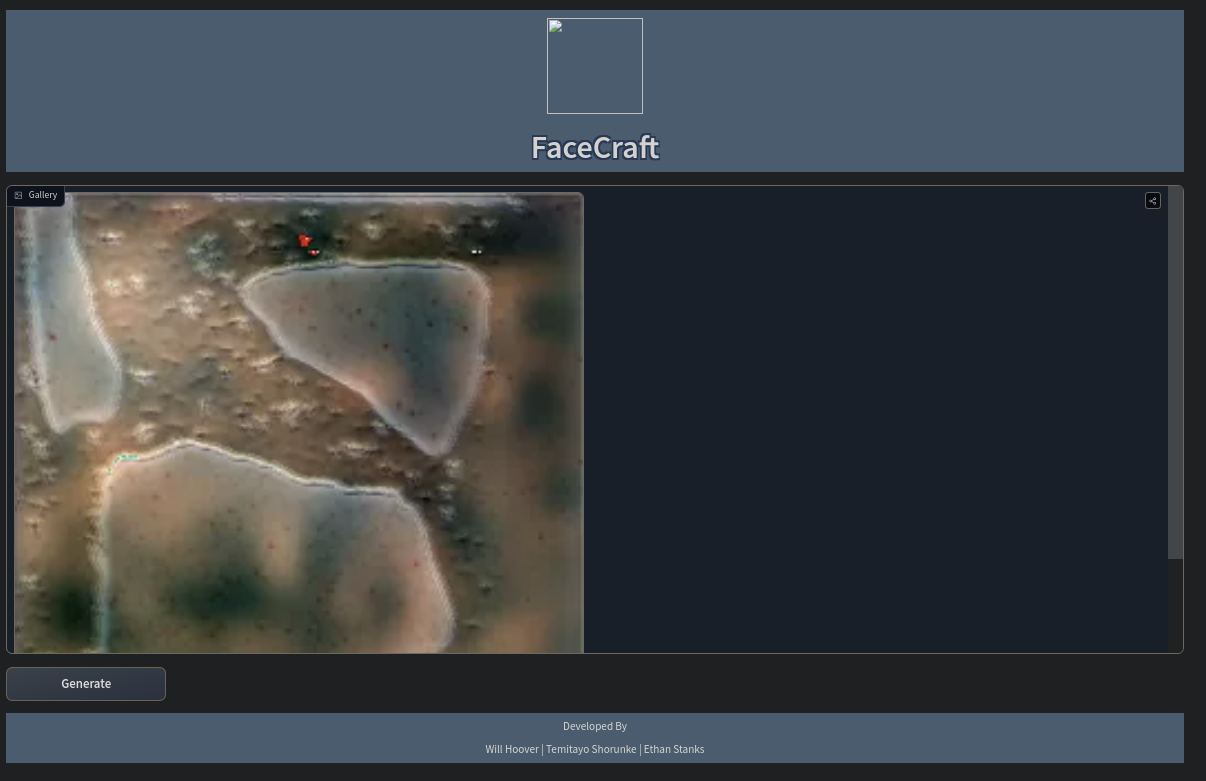
The changes made in our design document include a new logo and name, where the back-end and front-end will be hosted, and prompt rules. We decided that the front-end will no longer use the React framework. We found out that HuggingFace allows static website hosting and can easily access hosted models. The new framework used will be HTML, as it's a lot easier to deploy on HuggingFace.
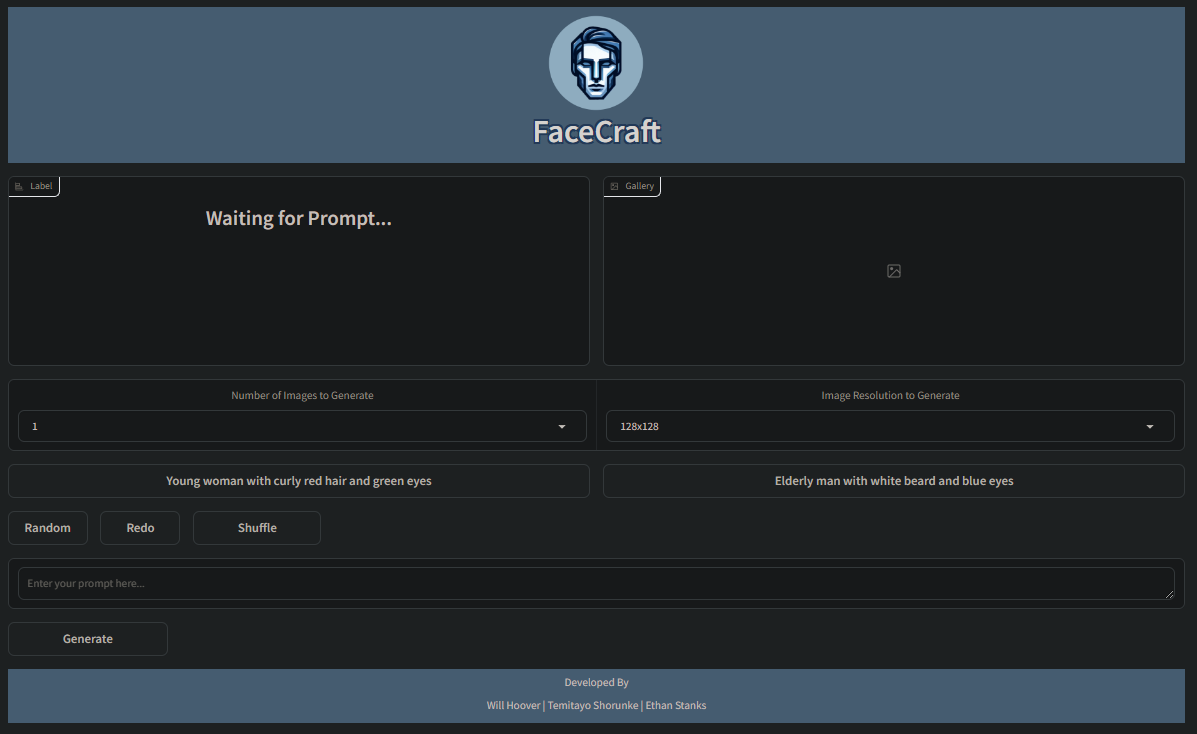
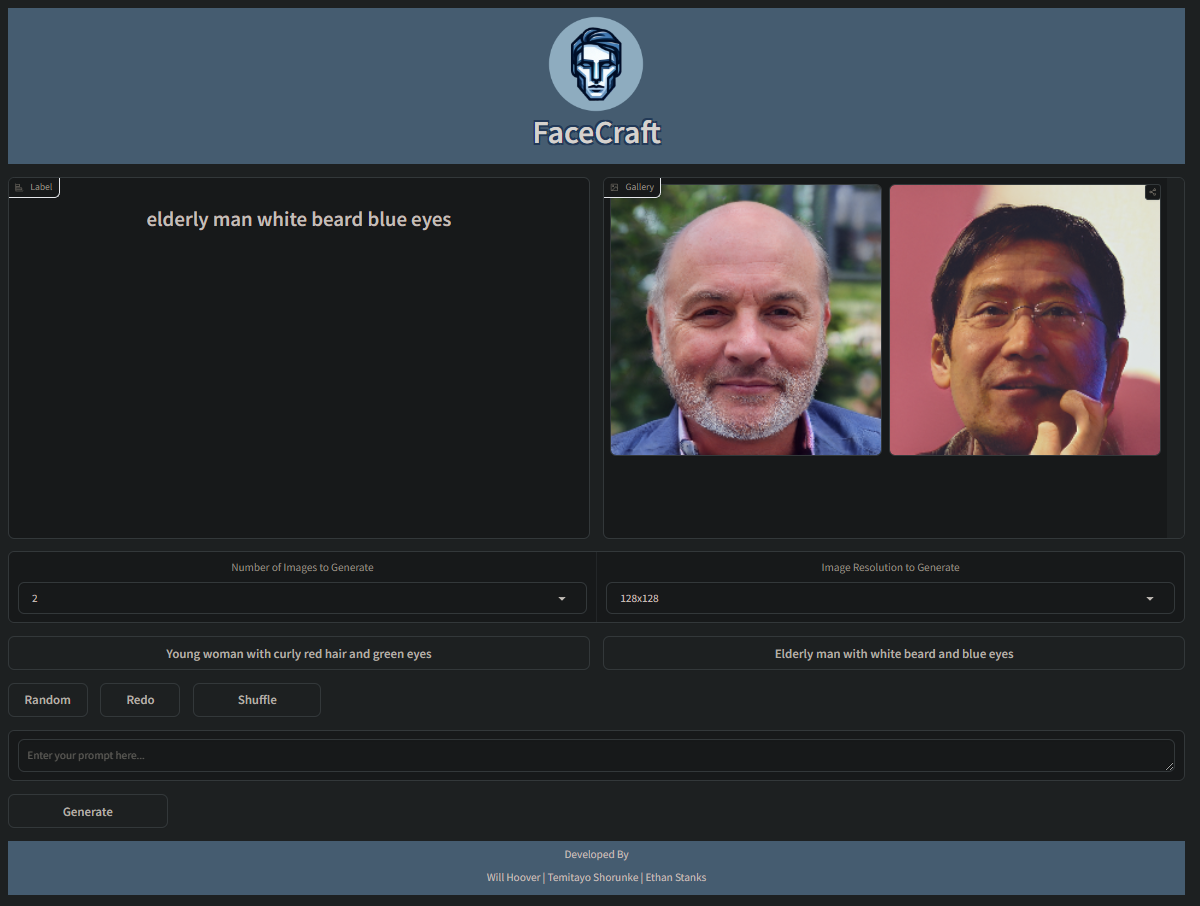
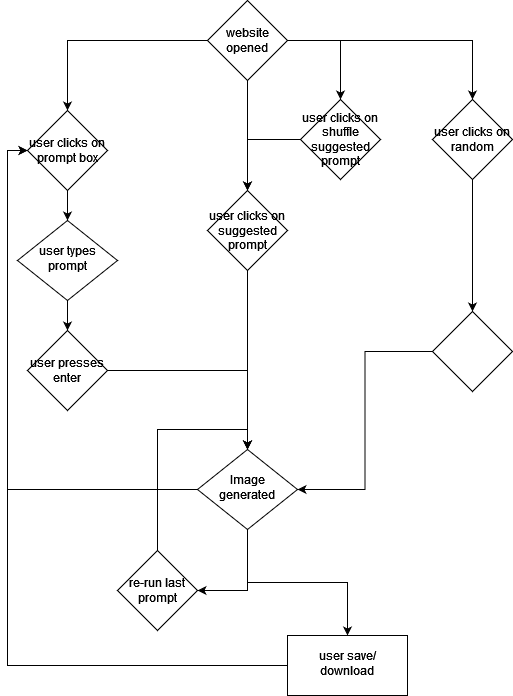
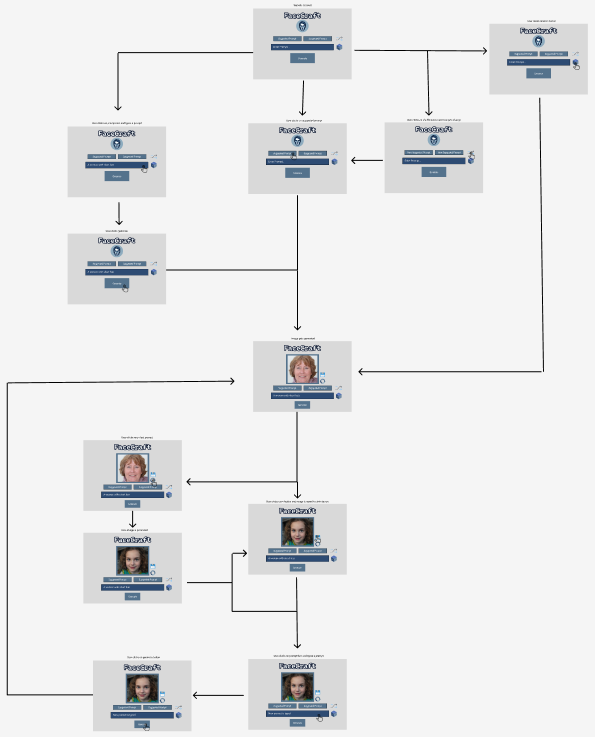
The first draft for the wireframe was created using Figma. I created it following the user flow the team had created in the design document. It will serve as a reference for when I start developing the front-end in month two. Below this post, you can see how it looks!
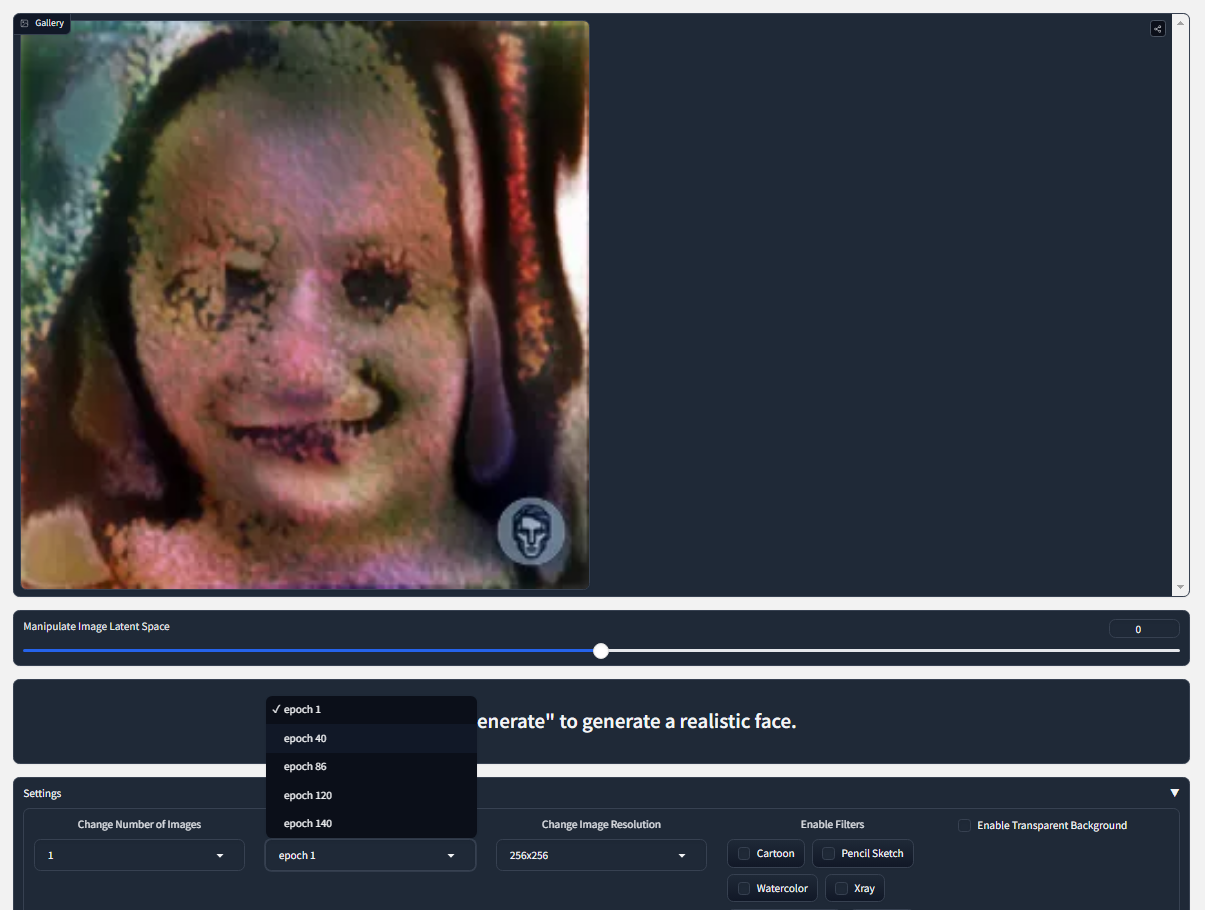
The Jira board has a total of 33 To-Dos across different To-Do categories: Dataset, NLP, GANS, Front-End, and Back-End. The team and I went through and added descriptions to each to-do as a measurable assessment that answers, "How do we know this task is complete?" The front-end and back-end to-dos have a lot of features under them, but I feel very confident in getting them knocked out within the first month. I believe Temitayo is developing the NLP model from a pre-trained model, and Will is developing the GANs model from scratch. I'm mostly worried about the GANs model, as I have no experience working with one, so I will try to help Will out when needed.
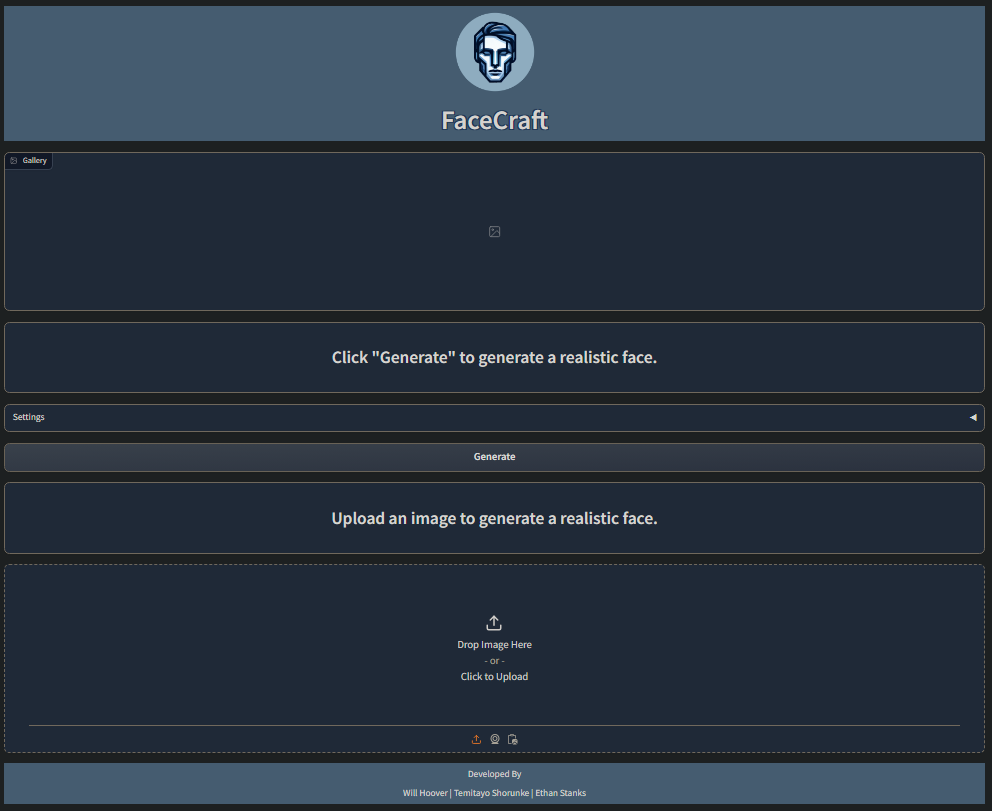
Aside from team development this week, I did more research on what I'll be doing. I messed around with CSS to get a better understanding of how styling HTML elements works. My practice was actually this website. I completely overhauled all the CSS on it, making it go from a basic-looking HTML website to a professional design. Since I know I'll be doing front-end on huggingface, I created an organization for the team and made a private interface space. The project's interface just has our new logo and a greeting for the team until I start the front-end development. Lastly, I started a LinkedIn Learning course on GAN models. I haven't finished it yet, but it utilizes Google Colab for model development.
One more week to go!
Word Count: 466
This was the last week for project planning! Tomorrow starts my one-week spring break, then it's onto the first month of development.
Not much was done this week, but some productive tasks were completed. First, I got refreshed and learned more about sprint planning and SCRUM. During production months, the team and I will be completing one-week sprints in agile development. The final wireframe was due, but last week we already added the final touches, so nothing needed to change. At the start of the week, we met with Chad Gibson, our instructor, to go over our Jira board and the game plan for our project. I didn't have anything else to do for the week, so I thought I'd learn more about HuggingFace because that's what I'll be working on right away. My goal was to get a basic model hosted on HuggingFace and then make a basic HTML front-end for it on HuggingFace as well.
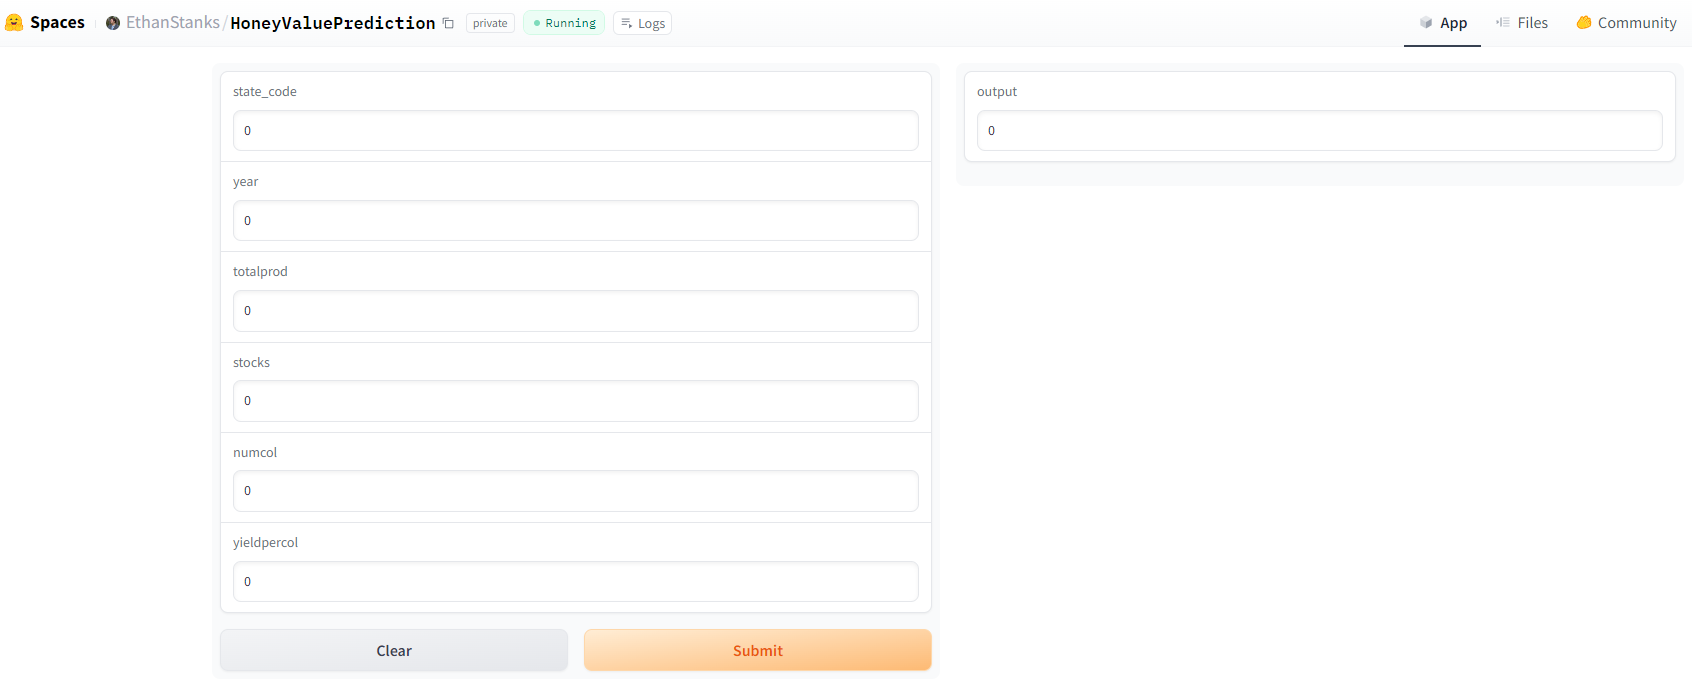
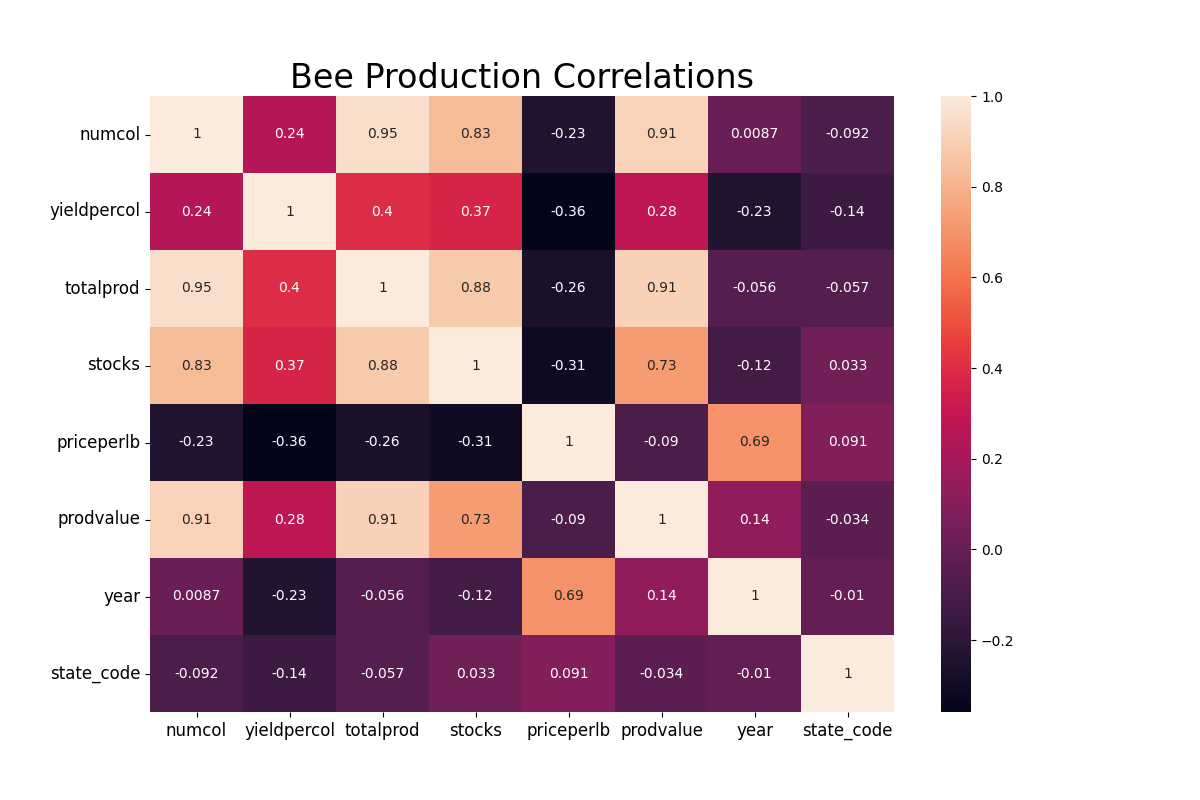
I found a free dataset on honey production in the USA from 1998 to 2012. I created some graphs for exploratory data analysis to see how well the data is and if there are any correlations I could use. My model is a basic KNeighborsRegressor from scikit-learn that predicts the honey's production value. It predicts this by learning these inputs: state, number of colonies, yield per colony, total production, stocks held by producers, and the year. The model, without any tweaking, performs at 82%, which is fine for the purpose it will serve.
Next for HuggingFace, they have three ways to upload data to their platform. Models, which is like a git repo for AI models. Datasets, where you can share datasets you have gathered. Spaces, where you can create interactive spaces for your projects. My first hypothesis was to upload my model under their model section, then create a space as the front end and connect the two. After creating a basic HTML front-end with javascript to fetch and send data to the model, I ran into some issues. HuggingFace's API endpoint for models typically works for transformers, but I have a custom-made model, so I would need to create a custom API wrapper.
A workaround I found for the problem is to have the model and front-end all under one space. The space uses Gradio, an interactive front-end Python library that can easily load the model from the local library and call predictions. The application is up and running, and I can easily make predictions on my model in the cloud, which was the goal. Sadly, I didn't get this to work with HTML. Over spring break, I plan on researching more about custom wrappers for an HTML front-end!
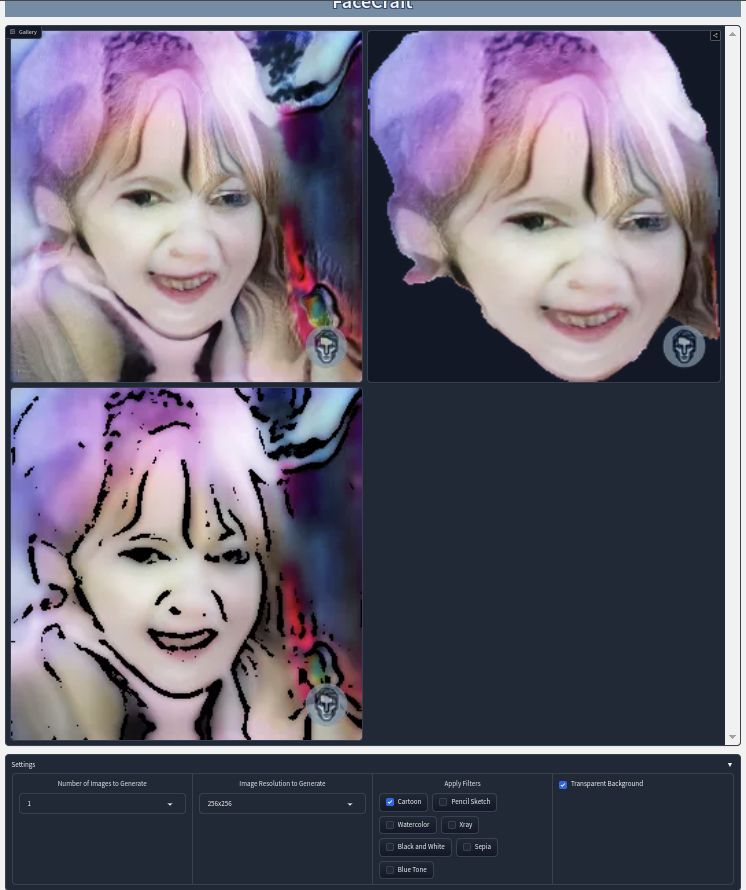
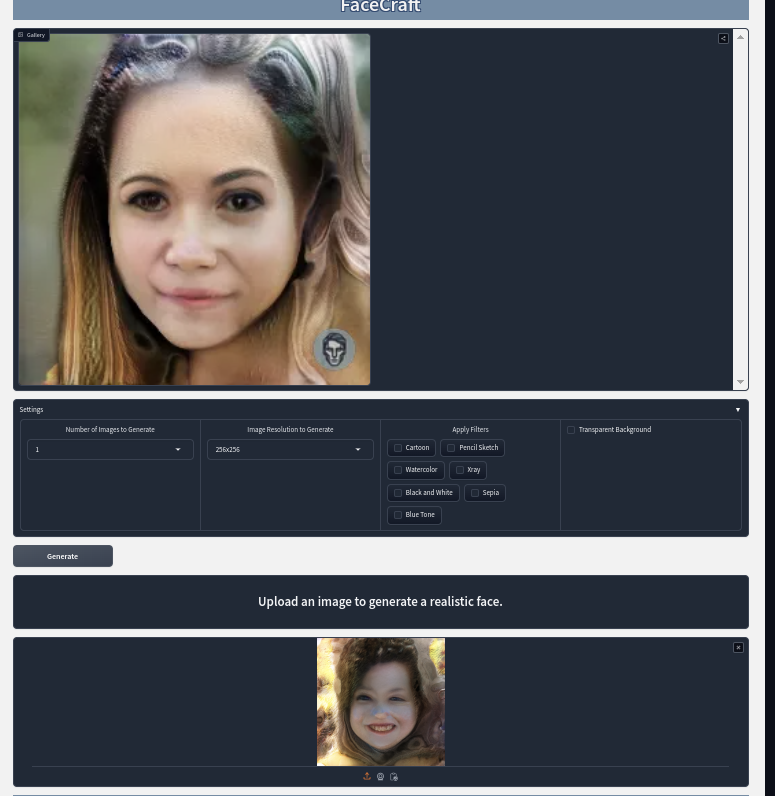
Below you can see the correlation plot for the dataset and the basic interactive web-app hosted on HuggingFace.
Word Count: 489
Spring break went fast, and now my team and I are already through the first week of development.
For our first week of spring, I was tasked with preprocessing the image dataset and creating a starter front-end display on HuggingFace that has the prompt box, image display, and random generation function.
I was also tasked with creating the discriminator for the GAN model and uploading models to HuggingFace.
Our Jira board for sprints is set up to have five categories: to-do, in progress, team testing, ready for review, and verified complete.
To-Do is where the tasks start during the sprint that need to be worked on, with each task having a team member assigned to it and an estimated completion time. In progress are tasks that team members are currently working on.
Team tests are tasks that have been completed but need verification from other team members. Ready for review are tasks verified by team members but that need verification from instructors that they are complete. Verified complete are tasks that have been checked off as complete by instructors.
This week, preprocessing of the image dataset and front-end display on HuggingFace are in the ready for review section. An image of the HuggingFace display is below. My task for creating the GAN discriminator is in the in-progress section. Uploading the models to Hugging Face was left in the to-do category because I didn't have any trained models to upload this week.
I created the discriminator by following a blog post for building a StyleGen 2 model from scratch that Will shared with me.
Building Stylegen 2 from scratch for image generation of women's clothes worked, so I was able to switch it to using the image dataset that I preprocessed. It all compiled and ran, but I was only able to train it on one epoch due to time constants. An image it generated from training on realistic faces is below. Since I didn't push the code to a branch yet or integrate it with the code that Will developed, I didn't mark it for team testing. It's really interesting to learn how the discriminator works. It transforms the image with a resolution of 2 log by 2 log of the width and height of the image to create feature maps of the same resolution. It takes it and runs it through blocks with residual connections. Then the resolution is down-sampled two times at each block while doubling the features. The discriminator blocks utilize a 3x3 equalized convolution with a Leaky Rely activation function, which is then down-sampled by using an AvePool2d.
Hopefully, next week, Will and I will be able to integrate the model and get it ready for training with checkpoints. I'd also like to run EDA on the images if that's possible to ensure the images in the dataset are what we are looking for and if any images could be considered poison for our training.
Word Count: 607
Another week goes by, and the project is slowly coming together. This week I was tasked with ensuring the prompt box only allows words, an option to rerun the last used prompt, performing EDA on the accuracy of generated images, and performing EDA on the generated captions for each image. I was also tasked with getting the GAN model uploaded and generating images on HuggingFace, but Will and I ran into some issues with the exported model files, so that will be pushed to next week.
Getting the prompt box to only allow words was fairly simple, as it already checks that there are words, so another if check was added in with that. I ran into some issues with Gradio, the Python interface library I use for HuggingFace, when creating the redo prompt button. I can't seem to add a button element at all to the interface. Even Gradio's documentation doesn't seem to load the example with a button, so it might be an issue on Gradio's side of things. My workaround was similar to last week for using the random seed option, a check box. If the redo last prompt checkbox is true, it will ignore whatever is in the prompt box and seed option, then run the last used prompt instead.
Now onto the fun stuff from this week, EDA.
I asked our instructor, Philip, what kind of EDA I could perform for images and computer vision in general. Images aren't as straightforward to explore like a dataset containing quantitative or categorical data, but instead are all made up of pixels. Philip recommend I look into algorithms that compare a generated image to the training images to get the accuarcry of how close the generation is to looking real. I did this by taking the generated image and sampling 1/4 of the training images. I then converted the images to PyTorch tensors. Looped through each training image tensor, calculating the perceptual distance and SSIM value between the tensor and the generated image tensor. After storing the calculation, I calculate the min, max, mean, and median of all the results to get a better look at how the generated image compares to all the sampled training images. The perceptual distance score reflects the visual difference perceived by human eyes, while the SSIM score shows how similar or different an image structure is based on its texture, brightness, and contrast.
Temitayo generated captions for each training image last week. That gave me an idea to explore the most commonly used words for each caption and how long each caption was to get a better picture of the NLP data. The captions are saved to a text file. I read the file as a csv file type using Pandas so that I could split it into two categories: image and caption. Using the Counter Python library, I separate each word into its own row and then get the total count. Using this count, I was able to create three graphs. A wordcloud and frequency bar graph display the most commonly used words in the captions. As well as a histogram that plots the lengths of each caption.
The graphs turned out great and can be seen below, as well as a screenshot from the image comparison EDA result. Next week, I hope to have a working model file that I can get hooked up to start generating images on HuggingFace as well as creating prompt suggestions on the interface. I know in the future I'll have to switch from using Gradio due to the contraints I'm having with it, but for the first month it'll be fine.
Word Count: 977
Ending this week, I'm feeling really good about how this project is going. I am finally able to design the Gradio interface in a way that I feel is better, and I got the test stylegan2 model up and running on HuggingFace!
One issue I ran into this week was getting the Cuda toolkit to work in any of my development environments. I am unable to have any of my Torch libraries recognize my Cuda toolkit install, forcing all my development to run on the CPU instead of the GPU. The only time I don't have this issue is when I run the codebase on Docker. This is a hastle because HuggingFace is its own docker and repo, so having two copies might add some confusion down the line. I'd like to look into using the HuggingFace space's Docker container locally for next week.
Also, last night on my laptop, I decided to make the switch from Windows to Linux for development. I'm using the Pop OS distribution, which seems to be Ubuntu-based. I'm hoping Linux development will be better for me in the long run and be great to learn.
My tasks for this week consisted of getting the Clip NLP model running on HuggingFace, creating a header and footer for the interface, adding suggested prompts, augmenting images to see how accurate the image comparison script I made is, and getting the stylegan2 model up and running on HuggingFace.
The image comparison script I created last week has some new features. Before, it was only able to take an image and compare it to 1/4 of the training images, producing a score from LPIPS and SSIM. Our instructor, Philip, recommended that I take a real image and compare it to an augmented version of that image to see how well these scores perform. I did this task by taking a real image from the training set and looping it nine times to get nine different augmentations to compare against. Using Keras's ImageDataGenerator, I applied a rotation, width and height shift, and zoom. These augmented images are then compared to the original image for scoring. I found that the LPIPS score remains high because the more augmentation you do, the lower it gets. I found that the SSIM score is low; maybe this scoring method is bad or the augmentation changes the image's structure so much that it can't find resemblance. Below is the plot of the image's augmentation and the scores.
Now on to creating the header and footer for the interface. Initially, for Gradio, I was using its interface class to create the front-end, but this was causing so many headaches. I couldn't even get its button class to work with it, and these tasks involved creating HTML and custom CSS. After not being able to get the header HTML to appear above the interface, I found that Gradio has a low-level API system called Blocks, which is what the interface is made off of. With blocks, I am able to break up each interface component into its own section, giving me more freedom to design the interface. I was then able to add the header and footer and even switch to using buttons instead of checkboxes. The blocks were also super simple for getting the prompt suggestions setup. All it does is grab two prompts from a hardcoded list of 50 prompts. Below is an image of how the interface now looks. Next week, I'd like to polish the layout and sizes so they look more organized.
Getting the Clip NLP model onto HuggingFace was pretty straightforward. HuggingFace originally runs on the CPU, so I had to comment out all the GAN code in order for Temitayo's ClipGanIntegration script to run on the HuggingFace container. When a prompt is entered, it goes through his clip code and is then sent back to the front-end to be displayed on the interface to see what the prompt looks like before getting sent to the GAN model.
Remember me saying I had issues getting the Cuda toolkit to work on my machines? Well, that means I can't test the GAN integration locally. I initially tried to test it on HuggingFace but ran into issues because HuggingFace is using a CPU and can only handle full float tensors. Before the team spends any money on upgrading the HuggingFace space to a GPU, I wanted to see it actually work locally. The workaround for this was putting the HuggingFace code inside our Docker container so that it could use the container's Cuda toolkit. Testing it this way worked! Will chipped in $40 to upgrade the space to a GPU. It runs perfectly on HuggingFace's cheapest GPU for 40 cents an hour. The space allows pausing, so we only have it running now when we want to test a feature or showcase it during a build review, so as not to spend money on something that isn't needed. Below is an image of it running on HuggingFace using a suggested prompt, outputing the prompt clip used and the images that were generated.
Next week is the last week for the first month of development. I'd like to get Will's stylegan2 model running on HuggingFace instead of the test stylegan2 model that Temitayo uses. As well as getting the interface looking sharper and any more recommendations for the image compare from Philip. We still have two more months of development, so the team is discussing routes we can take with this software for more development. I had ideas for how we can make realistic faces for billboard advertisements, image to image generation, where you take an image and turn its characteristics into a realistic person, and lastly, background generation for the faces. I have no idea where the project could go in the following months, but I know it'll be awesome!
Word Count: 516
The last week of the first month is now over. The project has two more months to go until it is all complete. This month I worked on getting machine learning applications running and working on HuggingFace, creating a front-end application with Gradio, creating the initial discriminator for the GAN model, performing EDA on image comparison and NLP captions, and collaborating with my team to get their work integrated into one system. Next month, I'd like to do more machine learning work. What the team wanted for the project is almost done, so there is plenty of room for more expansion and the capabilities of new systems.
This week, my tasks involved redesigning the layout of the Gradio front-end, updating the prompt to handle multiple languages from Temitayo's functions, adjusting the image compare script for Will, adding an upload image as an input option, adding a new output for person description generation, generating images from Will's pickle file, and displaying image accuracy scores.
I updated the image comparison script for Will to integrate into his scripts. I made functions that can compare png to png, png to numpy array, and numpy array to numpy array. I'm hoping to use this for the image input to compare a real image to what his GAN model generated.
Getting an image upload as an input for HuggingSpace was simple, but I did run into issues. The default file type when it is uploaded is a numpy array. This causes issues when I try to check if an image was uploaded because checking if a numpy array is None causes many headaches. After a couple hours and many StackOverFlow tabs, I switched to using a Pillow image as the default. Then, when the image is uploaded, I should be able to easily convert it to a numpy array.
Temitayo plans to generate descriptions of the faces that are generated. I created a new output for that description to be displayed when that system is implemented. He also updated his clip code to handle multiple languages, so I was able to easily update the text prompt to use them. Below is a picture of using a Spanish prompt.
Formatting the HuggingFace display was very needed, so I spent a lot of time trying to make it clear and organized. Gradio has an element called Accordion that I put the settings inside of because it allows the user to collapse the tab whenever they'd like. Gradio also has an element called Tab that creates a tabbing system like a web browser. Using the tab element, I separated the text prompt input and image input to create better organization. Below is what the interface now looks like before generating an image.
Word Count: 333
This was the first week of the second month of development. After this month, there is only one more to go! With the front-end running well on HuggingFace, I'm thinking of new ideas to bring to the table.
My tasks this week included adding Temitayo's description model to the back-end, adding fitlers and effects for the generations, and generating an image from Will's pickle file again.
I still don't have Will's pickle file implemented. It seems that each week he is evolving it somehow, so there is never a version that I can use. I'd really like to get it implemented this month, but I have no clue how things are on his side of the development. The biggest issue is getting his pickle file integrated with Temitayo's pre-trained CLIP model.
Getting the description model hooked up to the back-end went well. I already set up HuggingFace previously for easy integration, so no issues occurred.
The majority of my week involved getting filters and effects set up using the CV2 library. Temitayo suggested I create a cartoon effect, which I had no idea was possible at first, but my instructor Philip recommended I check out a guide on getting it setup. After battling with issues, I was able to get the first effect, cartoonify, setup and running. With the issues from getting the first one setup in mind, I was able to easily get more work done. Effects I added include pencil, oil painting, water color, and x-ray. Fitlers I added include black and white, blue tone, and sepia.
Next week, I'd like to look into using an AI model in my work. My idea is to use a pre-trained model or one from scratch to remove the background from the generated image. This can allow the user to better use the generated face for marketing, or we can implement our own custom backgrounds.
Below is a generated description on HuggingFace, as well as each filter and effect applied to the same generation.
Word Count: 365
After this week, I feel like the front-end and image processing are in a great place for the project. Next week, I'd love to dive into the stylegan-t model with Will to help him engineer it. Today, he gave me a rundown of the current issues he is facing. I'll have a lot of reading ahead to catch up with understanding the system, but it'll be a great learning experience.
This week, I was tasked with getting the background removed from a generated face. I thought about doing this so we can apply our own background in the future or even augment the head itself onto a live webcam. There are plenty of possibilities for using this feature. This was done by a GitHub repo that my instructor Philip recommended. I installed Wiktorlazarski's head segmentation into HuggingFace's requirements. After it's installed, it can access their files so that it can segment a passed-in image. The result of their pipline has an image range of 0-1. Adjusting it to a 0-255 alpha channel allows the background to be transparent. To remove any extra space, I find the min and max coordinates of the head and crop around them. The result is below.
I finished the transparent task earlier than expected, so I pulled the watermark task out of the backlog. All I did for this task was load our logo into a Pillow image, resize it to 1/8 of the generated image's size, then draw the logo image onto the generated image in the bottom right. The result is below. I originally had the watermark on the transparent background image, but it reverts the background back to black, so I need to look more into that.
With half a week remaining and out of ideas for what to do, I decided to do some LinkedIn learning. I was still pretty lost with Docker. I found a learning path that the Docker team put together on LinkedIn Learning. Completing the learning path earned me a Docker Foundations Professional Certificate. I feel a lot more comfortable using Docker and understand everything there is to containerization, Docker images, and even debugging Docker containers. Below is the certification I earned.
Word Count: 604
The weeks are going faster and faster; sooner or later, this project will be complete! After last week, I ran out of ideas for what I could contribute. Will is working on the StyleGan-T model, so the group decided to help him.
I was tasked with updating HuggingFace to include Temitayo's new description script. Since I was going to start helping Will, I tasked myself with researching the StyleGan-T architecture. At the start of the week, Will was running into errors while starting the training of the model. He and I tasked ourselves with troubleshooting to get training started.
Updating the description script was simple. All I had to do was replace the script with the new one and replace a function call in the Gradio app script. Below is how the output now looks.
Researching StyleGan-T was okay. If I am to give a score on my understanding of how it all works, I'd say 40%, but reading papers isn't a skill I have, sadly. I tried to understand it all by reading the paper a couple times, but there is so much going on in it that I can't wrap my head around it. I'm more of a hands-on, do-it learner. I did find a nice video on YouTube that spent an hour going over and explaining the figures only, which helped me a lot.
By the time I was ready to start working with Will, he had figured out the issue and was able to start training. That means I really only did two days worth of work and research. After a whole day of training, Will provided me with the pickle file for the model. He didn't have anything setup to actually generate images from the file, so I figured I'd give myself that task. After a couple days, I figured it out!
I load the model from the pickle file using the Python dill package. Take the prompt and encode it through the clip model to get the text features. Get 'z' by the number of images to generate, the z_dim, and the torch device. Then generate the image using the loaded model using the encoded prompt and z. After the image is generated, I convert it to a Pillow image for better display.
Great, so I have the model loading from the pickle file locally, so why not try and get it working on HuggingFace? Well, that's where I ran into some issues. Locally, I am running on our own Docker images with all the files Will used for training. On HuggingFace, it uses its own Docker image, and I don't know what files the model will need when it is loaded. I created a basic Gradio interface that works with the model locally. Putting all the generation code in a new HuggingFace space with the new Gradio app runs into errors. I went through over 20 of them. Most were missing modules and issues with file paths, but now I'm at one I haven't been able to figure out. Below is the generation using the Gradio app locally, as well as the error I get on HuggingFace.
Next week I am moving from Florida to Tennessee, so I don't know how my internet situation will be. I talked to Will about what he thinks I can work on that is small but helpful for him. He said it'd be great to have a Gradio interface for his training. Right now, he has to type out a long command for starting the training and wants an interface to change the many different options we can do for it.
Word Count: 448
This week was very hard to work on the project due to moving. Monday and Tuesday, I was finishing getting everything packed up. On Wednesday, I spent the whole day loading up the Uhaul truck. On Thursday, I drove for over 11 hours from Florida to Tennessee. Friday and Saturday, I spent unloading and getting everything organized. I wasn't able to actually get work done until late Saturday evening and today.
I was tasked with creating an interface for the training process to help Will. I've been feeling very great about my abilities to create Gradio interfaces. I knew I'd need to create some kind of toggle on/off for each training option. Also, each training option has an input, which could be a string, integer, float, bool, or even multiple booleans. There are also some options that are required, so they can't be turned off. With all that, I went through and started making the interface.
To keep the interface looking organized due to having 25 different options, I used Gradio's Accordion block to separate the toggle on/off from the inputs. I used TextBlocks for strings, Number blocks for integers and floats, Checkbox blocks for bools, and a Radio block for multiple booleans.
Now how does the command get created? I pass all 50 interface blocks to a build command function: 25 for toggle on/off and 25 for the inputs. I hardcoded the command to start with "python /app/Python/data/SG2/train.py" as it needs to use Python to call the command and needs to run the train.py script. Then it goes through each of the 25 toggle checkboxes to see which ones are checked. If one is toggled on, it will add the command and the input to the end of the command string. After checking each toggle, it will return the command to the interface.
I originally planned for it to actually start training using Subprocess, but it was having issues trying to start the train script. It does provide the command in an output textbox that we can paste into the terminal ourselves. Below is the result after running it with the required toggles and how the input and toggle sections look.
Today is the last day of month three. Next month, hopefully, the model will be trained long enough for good results. I plan The group discussed taking the output result of the model and running more image augmentations on it. I also had an idea where we could deep-fake our live webcam onto the image to make it seem like the generated face is the one talking. We have one or two more months to go, so hopefully our end product looks clean and functions well!
Word Count: 712
With two months left to go, the team is narrowing down what is left to be done. Will has been working on training the stylegan-t model; Temitayo has been working on setting up image augmentation; and I have been dedicating my time to helping Will. Will has been having all sorts of issues with his laptop, which he uses to train the model. Last week, he ran into a big issue that wouldn't let him train past 20 epochs. The model is set up to save a pickle file and a generation image from the current state of the generator every 5 epochs. For some reason, every time it got to the 20th epoch, it would crash for him.
This week, I was tasked with helping Will figure out this issue. During my group's meeting, I mentioned that it may be a memory issue. If it's crashing at 20 epochs every time, then maybe it is keeping the other saved models in memory and then running out of room at the 20'th epoch model. With this in mind, I went digging in the training loop.
The training loop takes in a load of parameters, but the one I wanted to focus on was the network snapshot ticks. This parameter is used to tell the loop how often to save network snapshots. We have this set to five, so it will save: 0, 5, 10, 15, and then crash on 20. When it sees that the current tick needs to save a snapshot, it creates a dictionary that contains the generator, descriminator, model, and training arguments. It will make a deep copy of the model, which is very memory-intensive. Strangely enough, Will conserves memory in the loop by deleting the deep copy after storing it, so it can't be that. Later in the process, the script evaluates the training metrics. After outputing the metrics, it will conserve memory by deleting the dictionary that stores the generator, discriminator, model, and training arguments. With it deleting these two variables that utilize a lot of memory, I can't seem to think of what would cause this issue.
Will always seems to run into issues with WSL. Our instructor, Phil, discussed during the meeting that the issue could be a result of the Docker container or WSL not having enough allocated disk space or memory. Will already tried to allocate more space for both on his Docker container, but that was no luck. While Will worked on figuring out how to allocate more space for WSL, I wanted to run the training on my machine to see if I ran into the same issue with it crashing at 20 epochs. Will's machine runs Docker on WSL2 using Ubuntu on Windows. My machine runs Docker using a Linux distribution, so I won't run into any issues with WSL. After fixing some pathing issues, I was able to start training the model using labels and images. I left to run some errands and came back to the training on epoch 50! Since then, Will and I have discussed switching his laptop to a Linux distribution instead of running WSL on Windows. I have been running the training on my laptop for the past three or four days. Below is a GIF of all the image snapshots that were saved. It's very interesting to see how the images change over time, including the generator exploring different saturation levels, like going from black all the way to fully white. As of right now, the model has been trained on 1,500 kimgs. I'm going to continue to train the model until Will gets his laptop all ready for training again. Also, I was tasked with figuring out how to generate images from the pickle file on HuggingFace and fixing the error there, but I haven't been able to use my working laptop while it trains.
Next week, I want to generate valuable descriptions for the Flickr face dataset. The dataset the model is currently training on contains a variety of images that are not exclusive to faces. We can't use the Flickr dataset due to not having good enough labels for the images. If I can get some decent descriptions generated, we can narrow the training scope to better match FaceCraft's goals.
Word Count: 500
This week, my goals were to generate label data for the Flickr image dataset. In order to train the stylegan-t model for realistic faces with prompts, we need labels that hold enough information so the pretrained clip model can get plenty of insights into the different attributes of each image. The ultimate goal is for the model to understand almost every attribute, like hair color, eye color, age, and what a person is wearing. I wasn't able to get to all that this week, but I feel like what I have is a start.
At the beginning of the week, I ran training on my end. Will was able to have his machine back up and running on a Linux distribution, so I was able to pass it off to him to continue off from my latest snapshot. Below is the last snapshot image I had, around 2901kimgs.
Back to labels: I wanted to get the basics down for generating attributes. A person's race, gender, age, and emotions can provide a lot of information about the labels. I tried to find a pretrain model that had all those attributes and more, but wasn't able to. I did find one on GitHub, DeepFace, that is able to generate decent results. It took some time to get it working due to outdated documentation, but I was able to get it up and running with a test image. Sometimes it wasn't able to recognize the face on an image. To not have missing label information, I put “n/a” in instead of leaving the image out. It did this for 6,094 out of the 70,000 total images. For images it did work for, it would seem to be very accurate. Below is an example, and here is the label that was generated: “asian 29 years old Woman, appears happy.” I don't know how to structure the sentence for the clip model, so I formatted it as “{race} {age} years old {gender}, appears {emotion}.”
I asked Will if he thought that was good enough or if I should continue adding more attributes. He agreed that adding more attributes would be a lot better and mentioned glasses. I found a pretrained model on GitHub that does just that. Glasses-detector can create a bounding box around classes or can classify if images have glasses of any type by returning true or false. Once I got it setup and was working on test images, I added it to the label generation structure. When it checks for the DeepFace attributes, it will also check if the person is wearing glasses. Below is an example image with this label: “black 30 years old Man with glasses, appears sad.” If the glasses classifier came back true, I slapped “with glasses” in the middle of the label. As you can see in the image, the person has glasses, but they are a woman and don't appear sad at all. Sometimes it also says they have glasses when they don't. This might poison the model, so further review may be required.
Either next week or some other time, I'd like to see if I can add more to this. I'd like to get eye color, hair color, different hair styles, facial hair, and even more clothing.
Word Count: 567
I am writing this blog halfway through the week as I will be going on a vacation to Mexico tomorrow. This week I was tasked with debugging and fixing the errors for getting our pickle file generating on HuggingFace. I wanted to complete a task that wouldn't take me all week, but it would still be a great use of time to try and figure it out.
The error I started with was an issue with not having custom hooks inside the HuggingFace codebase. I found where the code calls these custom hooks, but I have no idea how to actually add them in. I decided to start from scratch in a folder where it wouldn't be able to access any dependencies inside the original local repository. Doing this, I can see exactly what the pickle file would need in order to generate. I was then able to work through all the modules and hook dependencies by dropping the entire training module folder into the local space, which seemed to do the trick. Next was getting the pickle file to generate an image. I first tried to do this with a hardcoded prompt, but I ran into more errors. Something inside the mapping network causes it to not be able to process text encoding with the x and w for matrix math. I know Temitayo has generations working on his end because he demonstrated it with his image augmentation during the meeting this week. Taking a look at his code, I saw he is generating a random image from the pickle file and not one from a prompt. Taking what I learned from that, I implemented a new script that will only try to generate an image with a random z. That seemed to have worked, so I went onto getting it implemented on a new HuggingFace space.
When creating a new space, HuggingFace gives you a couple of options. Streamlit, Gradio, Docker, and Static. Normally, when I make a space, I go with Gradio because HuggingFace will run a Docker image that is ready to launch the Gradio application. This time, I went with the Docker option in order to run my own Docker image for the space. This can assure the space runs all the dependencies needed for the generation and gives me more control over it. It took me a while to finally get the space to work with Gradio. This is because I need to give write permissions for torch caching, user permissions, and ensure the Docker image will start the Gradio application. I got it working, and the random generation works! Below is a screenshot of it fully generating on HuggingFace using the cheapest GPU option at 40 cents per hour.
I wanted to see if Temitayo's code base has the same issue I have with generating with a text prompt. I have been running from Will's branch, which might be a couple versions ahead of Temitayo's version. After getting his folder and pickle file, I still wasn't able to get it to run. I got the same error as before. Below, you can see the shapes of x and w. I also included the error and where in the code this error is getting thrown. I tried to manipulate the shape of x and w for a long time, but no matter what I did, I wasn't able to “hack” it.
Word Count: 575
These weeks keep flying by faster and faster. After today, we will only have one month left for the project. With the current issues and our StyleGan-T model not training as intended, I don't think it will be possible to train the model to a good enough standard for the final turn-in. Will has spent the majority of his time working on getting the model as it is, so I would feel bad for all that work going to waste. I told him that if we can't get fully trained by the time we need to present, we can still train after we finish our degree. Then I'll go in and set it all up on HuggingFace and create a new readme for GitHub to have what we really wanted in the end.
This week, I tasked myself with getting the old StyleGan2 model up and running again. Will still left the file in our repository, so it didn't take long for me to get things up and going again. The only long part was getting the Flickr dataset downloaded again. The difference between the two models is that this one doesn't do text encoding. All generations would have to be random. If I can get this model trained for the remainder of the time we have, I'm sure we can get decent results for our final presentation.
I started to train the model on the dataset with a resolution of 128x128 for about 54 epochs. With the images so small and a batch size of 20, the model started picking things up pretty quick. I talked to Will and asked if I should bump up the resolution before I get too far into training the 128x128, and he agreed. I tried to train the model on 1024x1024 and 512x512, but I kept running out of allocated space for my laptop's GPU. Even lowering the batch size down to something like 5 didn't help. I eventually landed on being able to train the model with a resolution of 256x256 and a batch size of 15. The slightly smaller batch size and slightly larger resolution size will make training go for a couple more days, but hopefully pay off. Whenever I get the model up and running on HuggingFace, I can easily up-scale the images to 512x512. I was more worried about doing that with 128x128 resolution, but since 256x256 is half of 512x512, it should blurr too badly from up-scaling. I have it currently trained up to epoch 25. Below are five example images that were saved for Epoch 25.
With a month left, it's time to narrow down on things that must be completed. I will be training the old model until the team feels it is at a decent point to stop. I want to get this model working on HuggingFace and integrate all the old add-ons I had in the original HuggingFace space, like the image effects. I want to send Temitayo a version of my Pickle file so he can see if it will work with his image manipulation work. I want to get a set of instructions for training the model using a Docker file. I also want to get a set of instructions for running the Gradio application locally from a Docker file. If I get all this done within the next 2 to 3 weeks, I can spend more time getting my team's presentation ready. Time is ticking.
Word Count: 619
For the first week of my team's last month, I was tasked with getting the StyleGan2 model I am training to generate on HuggingFace. I was also tasked with creating detailed instructions for running our work using Docker and creating a new GitHub for the finished product, but I will save these tasks for next week. The first week of my last month is already over! It is actually insane how fast time flies by.
For HuggingFace, I first started by creating a new Docker space and cloning it to my local machine. I then looked into how generations are created in the training loop and mimicked it into its own function that I can call in a separate file. When the generate button is pressed on Gradio, the model will generate an image with a random z, get w by passing z into the mapping network, and then generate an image using w. The image is then passed back to Gradio. All this was setup before in my old HuggingFace space, so the only tricky part was getting this model's generator to work. Once it was generated, I took my old image manipulation effects and implemented them one by one. I got my image effects to work after some time. I ran into issues with the type of image because before, I would perform the effects on Pillow images instead of PyTorch tensors. I also ran into some issues with dependencies and ended up commenting out the ability to do an oil painting effect. I added back the watermark script I made. Then I added the head segmentation script so that we could remove the background again. I ran into issues with my Docker file with the head segmentation's model download. After some time and messing with user permissions in the Docker file, I got it to finally work. With everything working locally, I worked on getting it to work on the HuggingFace space. Things are a little different from local to online for a HuggingFace repository, but I got things working after some time. Below is a picture of the current state of the space with a generation.
I wanted to see if I could generate an image from an image without using CLIP. I believe someone on my team was tasked with performing image-to-image translation using CLIP, but I am not a fan of all the dependencies needed to run CLIP on HuggingFace. It took quite a lot of errors, but once I worked through each one, I was finally able to start producing results. It works by finding a latent representation that corresponds to the target image in our model's space. Under the hood, it looks similar to how a normal generation is made, but with a lot of extra steps. I implemented it on HuggingFace by adding an image upload component. When the image is uploaded, Gradio turns it into a numpy array, the numpy array is turned into a PyTorch tensor, the tensor is projected into the model's latent space, and then an image is generated like it normally is but with a new Z from the projection. Below is an example of it working on HuggingFace. The bottom image is the uploaded image, and the top is the generated image from the translation.
Also, throughout the week, I continued training the model. As of writing, it has finished epoch 92. I plan to keep running this until the end of week 3, so there is still plenty of time for our model to really hammer in training. The example generations look great. I feel like in another week it will start producing medium-quality generations. Below are the examples generated from Epoch 92.
Word Count: 680
I can't believe how fast time is flying. Week two of the last month is a wrap. I was tasked with creating a new GitHub repository to serve as the final product. I was tasked with creating instructions for training and generating images using Docker. Also, I was tasked with fixing the logo not showing up on the HuggingFace space.
This week, training has come to a stop. For some odd reason, the images end up as fully black pixels. This happens after the second epoch from a loaded checkpoint. For instance, if I started to train from checkpoint 40, all images trained on epoch 42 and beyond would be black. Epoch 41, for some reason, is normal. The current checkpoint is good, but it's not great to use in the final product. Will is trying to get it running on his PC, but he is also facing the black image issue. Either something got corrupt in the checkpoints or something that we haven't found is causing this.
I spent a whole day working on getting the logo to load on HuggingFace. I kept trying every possible file path, changing the Docker file the space runs on, and even messing with the user permissions of read access for the files in the space. I just could not get it to work. The thing is, I have the logo loading on a different test space. On there, the file path is "file/logo.png," so I thought that would work on this one. The only difference between the two spaces is that this one runs on a custom Docker file I created. That's what made me think it was a Docker issue. Well, it was not. The whole time, I was missing one line inside the Gradio app script. “gr.set_static_paths(['.'])” will add all files as a static path. This is how the custom CSS will be able to find the logo and allow read access. The entire time, I was missing this line, and I even had it on the old test space! Below is a screenshot of the space.
Creating the new GitHub was pretty straight-forward. It was creating the Docker files that gave me some headaches. After about four to five days, I got two separate Docker files that a user can run depending on whether they want to train or generate. The instructions for the training Docker file will have the user open Visual Studio Code and then run the training script. The instructions for generating are a lot simpler. All they have to do is open localhost in their browser with the port of the Gradio application. I ran into a major issue with the CV2 pip install that the head segmentation needed. The containers build off NVIDIA's PyTorch container. Their container installs a cv2 version that makes a component of the head segmentation outdated. You would think uninstalling CV2 and then reinstalling it with the correct version would work, but it doesn't. The uninstall wouldn't remove all of the packages CV2 installs. Before reinstalling CV2, I had to set up the Docker file to remove the entire CV2 folder. This error took me two days, and it was the best feeling getting it to work today. Below is a screenshot of the instructions I made for the repository.
I have no idea what I will be working on next week. My guess is that I will be attempting to get Temitayo's work integrated into HuggingFace and the final GitHub repo. I'm nervous about adding CLIP to the codebase because it's the third week of the last month. Last time, there were so many dependencies and extra stuff needed to get it working on HuggingFace. I can't even imagine getting it working on every single custom Docker file I have made. I'm fine with just having it generated from a random z space, and I do have image-to-image generation working. I would rather focus on fixing the training issue and working on our presentation. But if the team thinks adding it is best, then I will try my best.
Word Count: 483
The project is coming to an end. This week was the last week for any development. I can't believe how fast these past five months have gone. I was tasked with integrating Temitayo's CLIP prompting code into the GitHub and HuggingFace repositories. I was also tasked with adding an option to pick which trained checkpoint to generate from. I finished these tasks pretty fast, so I had plenty of time to integrate Temitayo's image manipulation slider into the codebase as well.
Temitayo provided me with the script for generating from a prompt with CLIP. I was really worried about integrating his code because last time it was a whole mess of dependencies and modules. This time, however, went really well. It was all under one script and only needed one pip install, so I didn't have to change much. I didn't want to change the generation architecture I currently had, so I dissected his script and took out whatever functions I needed in order to get it working. Below is an example of generating from the prompt, “An old Asian man.”
The checkpoint selection was pretty straightforward. My original idea was to have separate generate buttons for each checkpoint. Depending on the button, it would use that correlating checkpoint to generate the image. The problem with that is all the buttons. My workaround is to use my settings section. I added a drop-down menu where the user can select what checkpoint they want to run from, with the default being our latest model. The app script will load all checkpoints when the application is started. When the user does any of the generation options, it will check to see what checkpoint they have selected and use the correlating model. Below is a screenshot of generating from Epoch 1.
I ended up having a lot more time on my hands than I originally expected. Temitayo sent over his script for the image manipulation slider. There is one slight issue with integrating it into a HuggingFace space. The script saves the last generated image's latent space and W. Then it takes those saved variables and manipulates the space using the slider. The issue is that the HuggingFace space is running as one instance for every user using it. Let's say user A generates an image. Right after user A's generation, user B does a generation. If user A moved the slider, it would use user B's latent space and W. Another issue is the multiple image generation. If the user generates four images, it will only manipulate the last generated image. I asked the team if they agreed to implement the slider even with those issues, and they said go for it. I mean, it works, but I would only manipulate the image's space if you were the only user running the HuggingFace space. Below is a generated image before and after moving the slider.
Word Count: 135
This is my final blog post for this project. It's actually crazy to type that out. I can't believe how fast time has flown by these past five months. I would say I feel a lot better about computer vision. At first, I was very scared of jumping into a big project like this, but having other people work on it helped a lot. I think my computer vision project would be something about agriculture. I'd love to get into plant crop analysis to help farmers utilize cheap machines for their work.
Here is a walkthrough video for the application running on Hugging Face: Video Link
Here is a presentation my team gave to finalize the project: Video Link
Onto the next part of my education journey with my masters in data science.
Ethan Stanks, signing off.